Aetheriae began with two instruments. I owned a Roland JP-8000 and wondered how its Super Saw was made: seven detuned saws in one oscillator, a whole section of synthesizers under a single key. And I was taken with the way the Solina, the string machine of the seventies, glues its sources together: a thin organ tone, a chorus of bucket-brigade chips, and out of them a sound that no single part makes alone. I wanted a plugin that did both, for myself.
The bucket-brigade chip, the BBD, is familiar ground at Morphor. Our Plectrum Eurorack module is a plucked string with a real BBD in its loop, and ECHON 6, our polyphonic BBD synthesizer, has six of the chips to clock, bias and keep in tune. The years of measuring what these chips really do, and listening to them, went into Aetheriae's bucket-brigade models: the ensemble's and the delay's lines, and the string resonator's BBD and Invert switches.
So I built one. And while I built it I kept adding what I was missing: a sampler for recordings, FM for bells and electric pianos, the phase distortion of the Casio CZ, physical models of strings and bars, and a breath of noise to go under all of it, until the instrument had every basic way of making a sound in it. My years with a Eurorack modular system shaped how they fit together. On a modular you patch a voice from whatever is in the case, source by source, and hear it as you go; I wanted that freedom, but on one big front panel, with nothing to patch: pick a synthesis technique as a source, sketch a texture with it, then layer another source beside it, and another, each with its own filters and envelope. The effects I reach for anyway, worn tape and vinyl, the ensemble, a phaser, a delay and a reverb, went into the signal path too, so that a sound is finished inside the instrument and needs no chain of plugins after it on the channel strip.
Aetheriae is for atmospheric music: ambient, film, synthwave, sound design, and anyone who wants to make evolving textures, pads, strings and drones, or who wants to learn synthesis from the ground up. Every technique in it is a source you can switch on beside the others and compare by ear, and this manual explains each one from first principles. It is not a workstation and not a sample library: it is an instrument, meant to be played.
The name is the aether, the fifth element of the Greeks and the heavens of the Latin poets, the stuff that fills the space between the stars: sound hanging in the air, which is what the instrument is for.
Aetheriae is free to use, in every format, with nothing held back. If it earns its place in your music, a contribution at morphor.io keeps it in development; and a sound you made with it, sent my way, is as welcome.
How to read this: if you are new to synthesis, start with How Aetheriae makes its sound, which follows one note through the whole instrument and explains each way of making sound on the way; then Sources, where each technique has a chapter of its own, with drawings and sounds to try. If you know your way around a synthesizer, Getting started and The panel will have you playing in a few minutes, and the reference at the back lists every control and shortcut. Either way, you can keep the tooltips on: every knob tells you what it does when you rest on it.
Have fun, and keep making music and sound yourself.
Eli Clement, Morphor
Introduction
Aetheriae is a hybrid texture synthesizer by Morphor. It makes evolving pads, strings, choirs, lo-fi drones and anything between, from up to eight sources a voice: wavetables, recorded samples, FM, phase distortion, physical resonators and noise, each with filters and an envelope of its own. Its roots are the string machines of the seventies, its effects the worn tape, vinyl and bucket-brigade chips of the decades after.
This manual explains every part of the instrument; if you are new to synthesis, start with How Aetheriae makes its sound, which follows a note through the whole instrument and explains each way of making sound on the way. You can read it from start to end, or jump to what you need from the contents. Its last chapters list every control and shortcut, made from the instrument itself, so they always match the version you have; a glossary explains the words of the trade, and the index finds anything.
Version 1.0.0, 13 October 2026
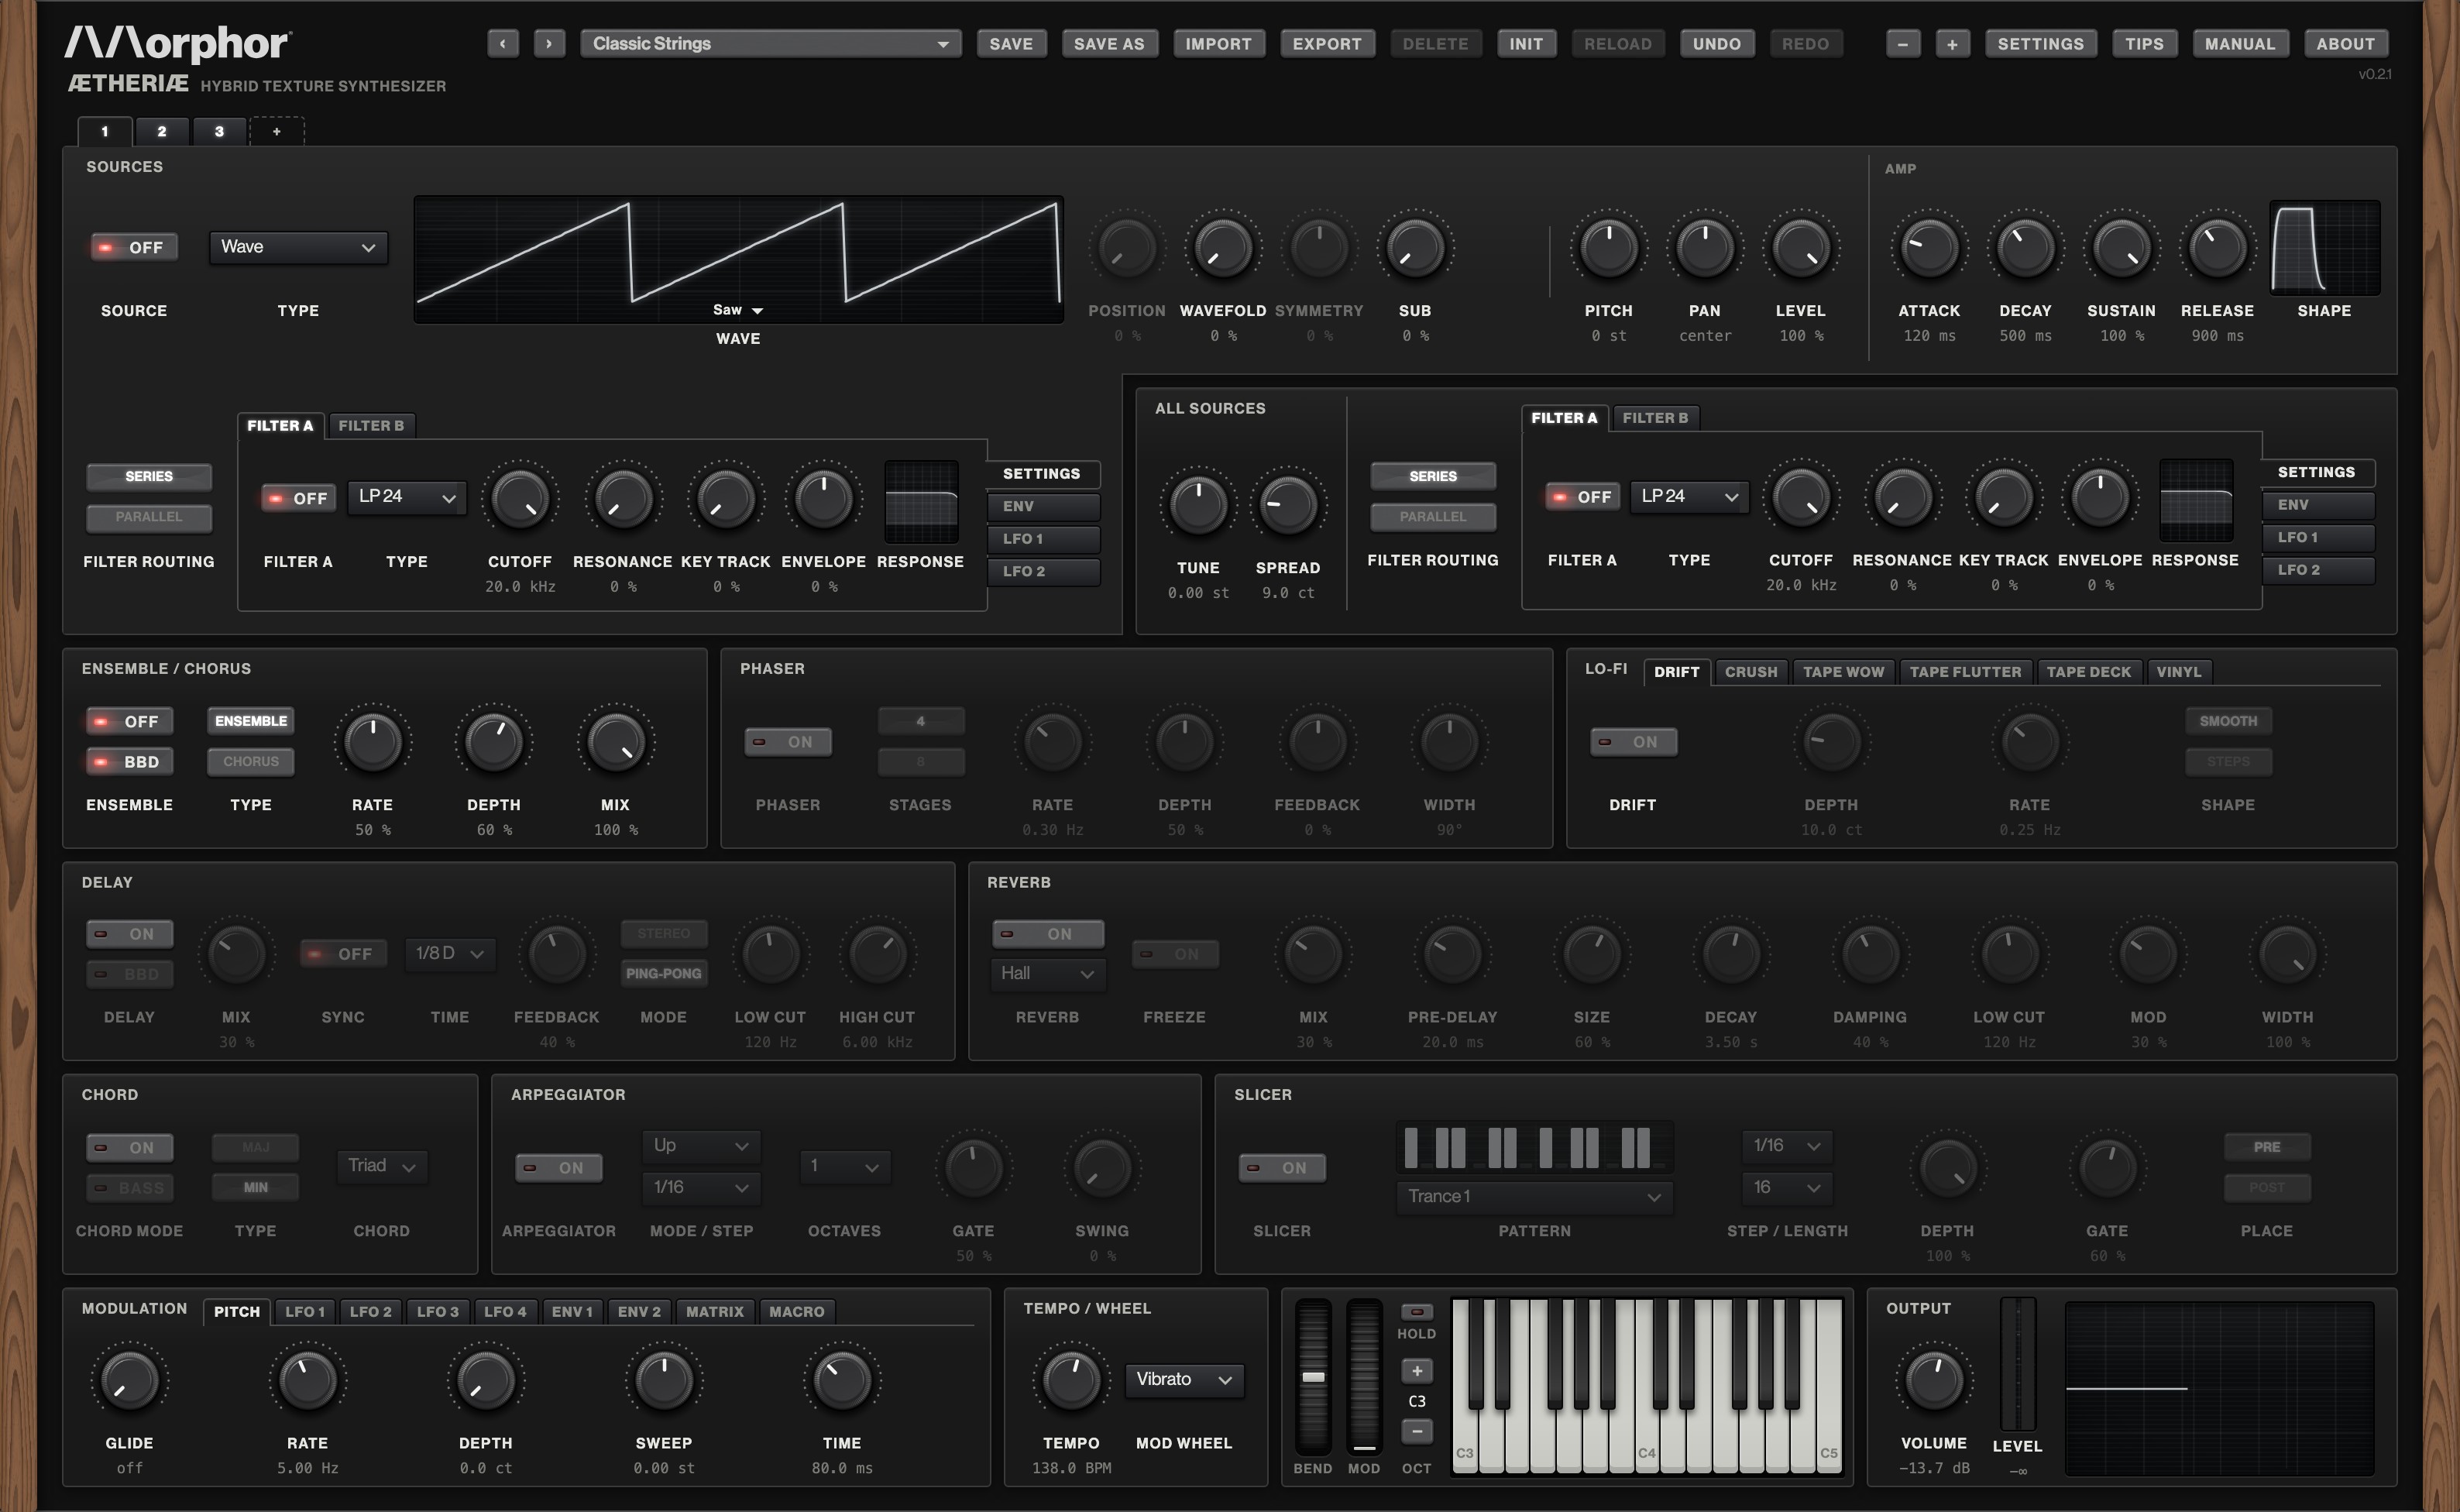
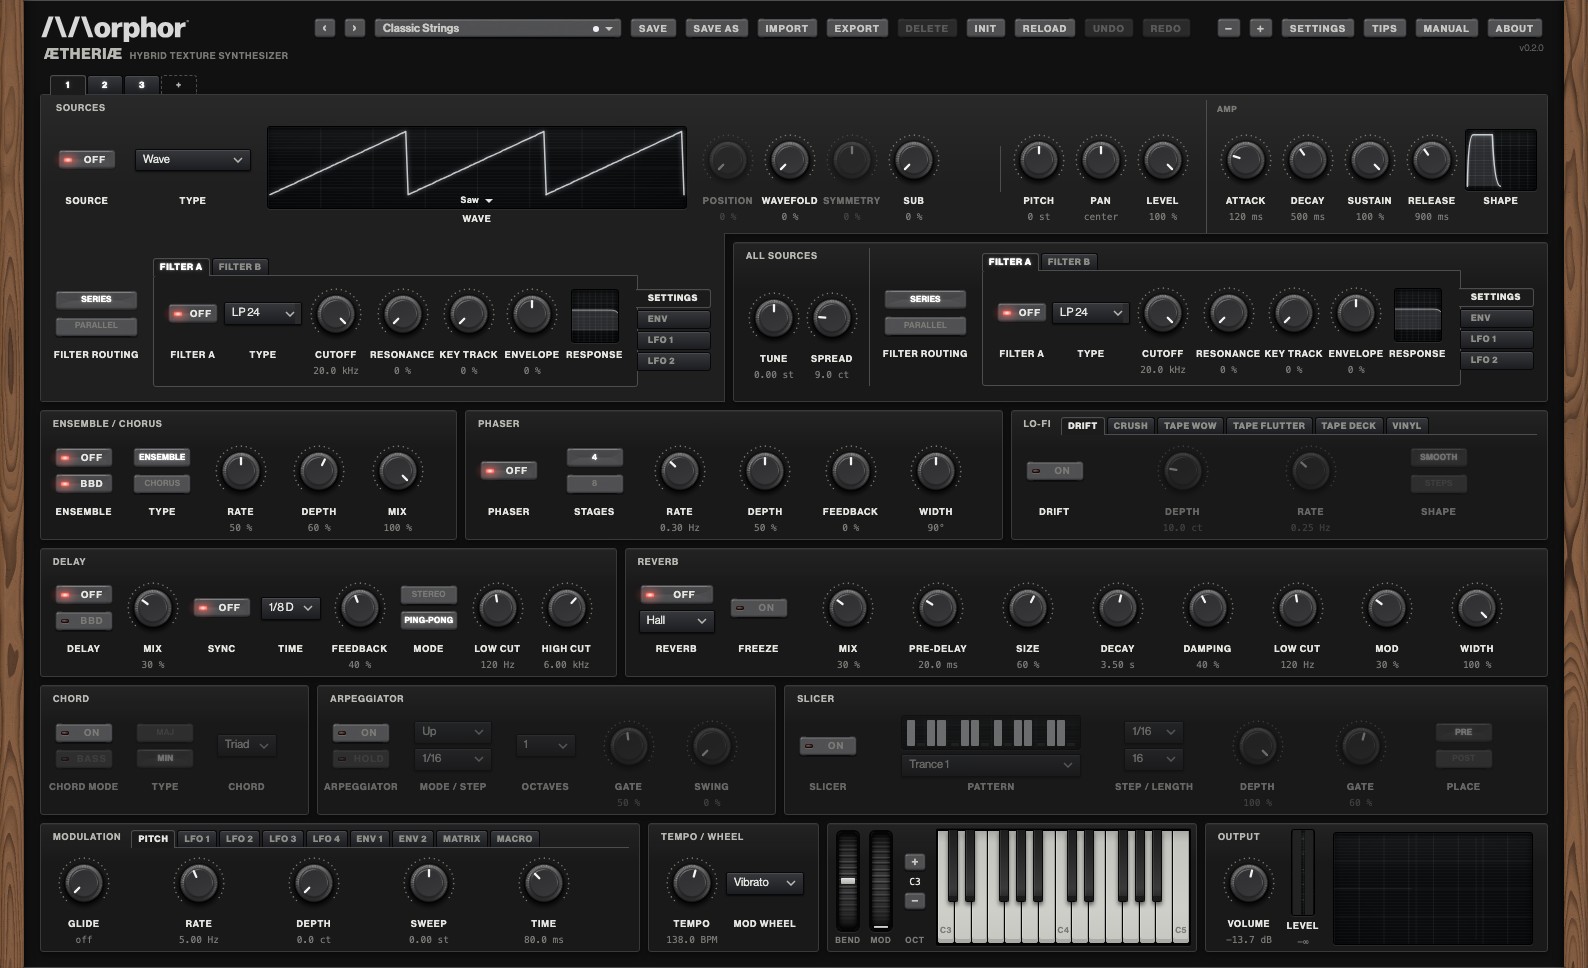
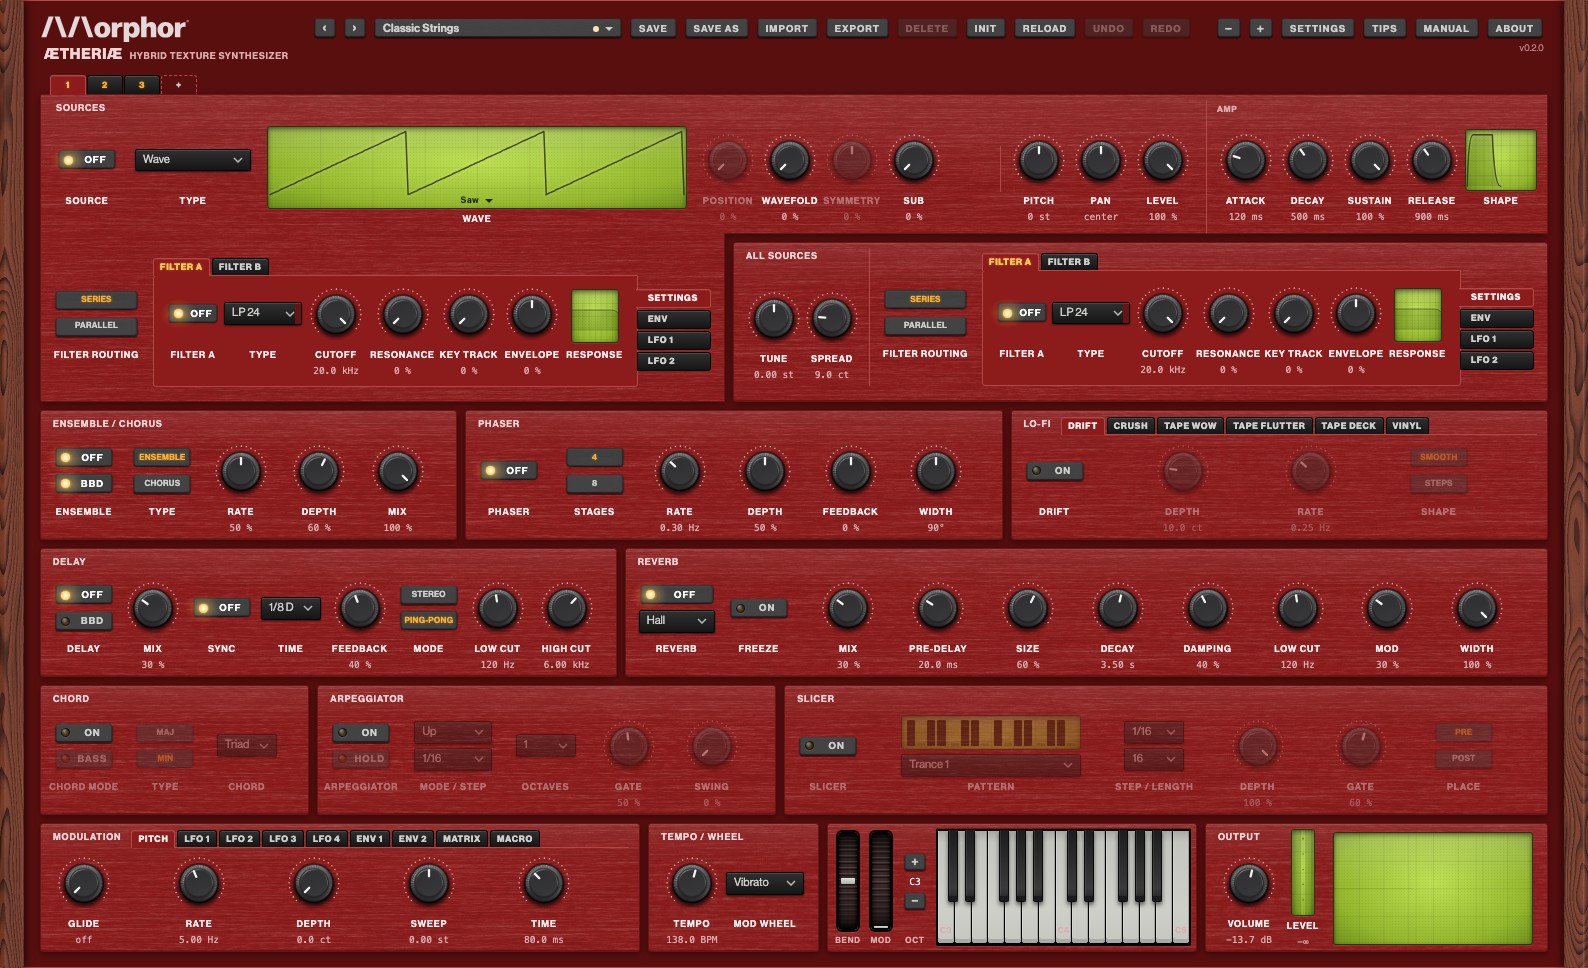
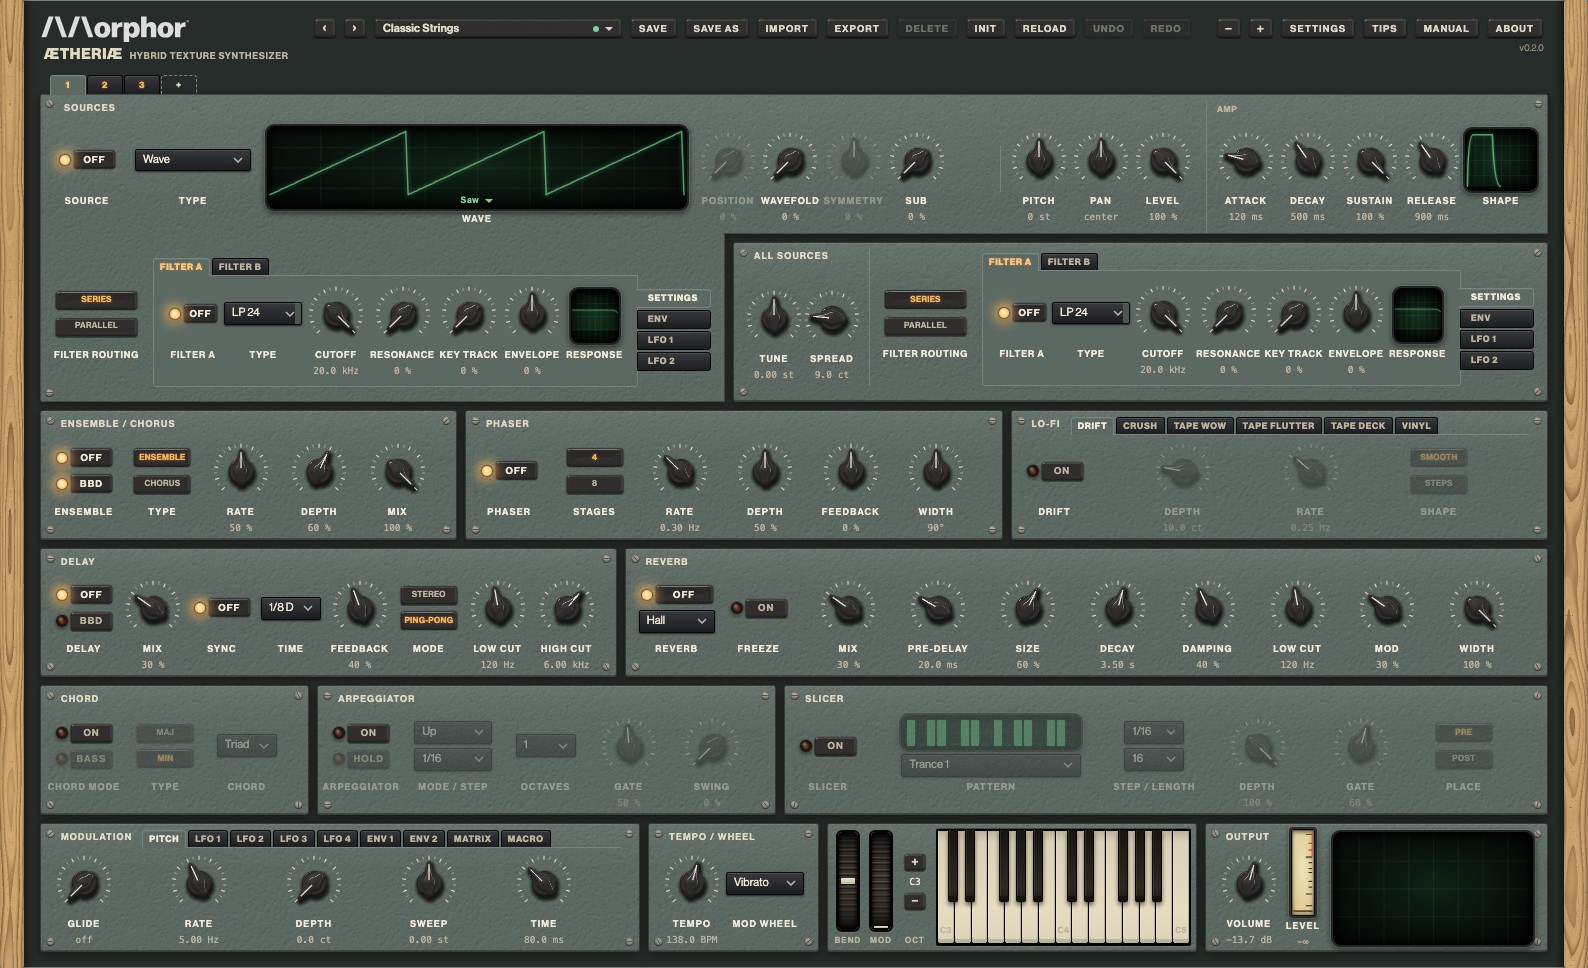
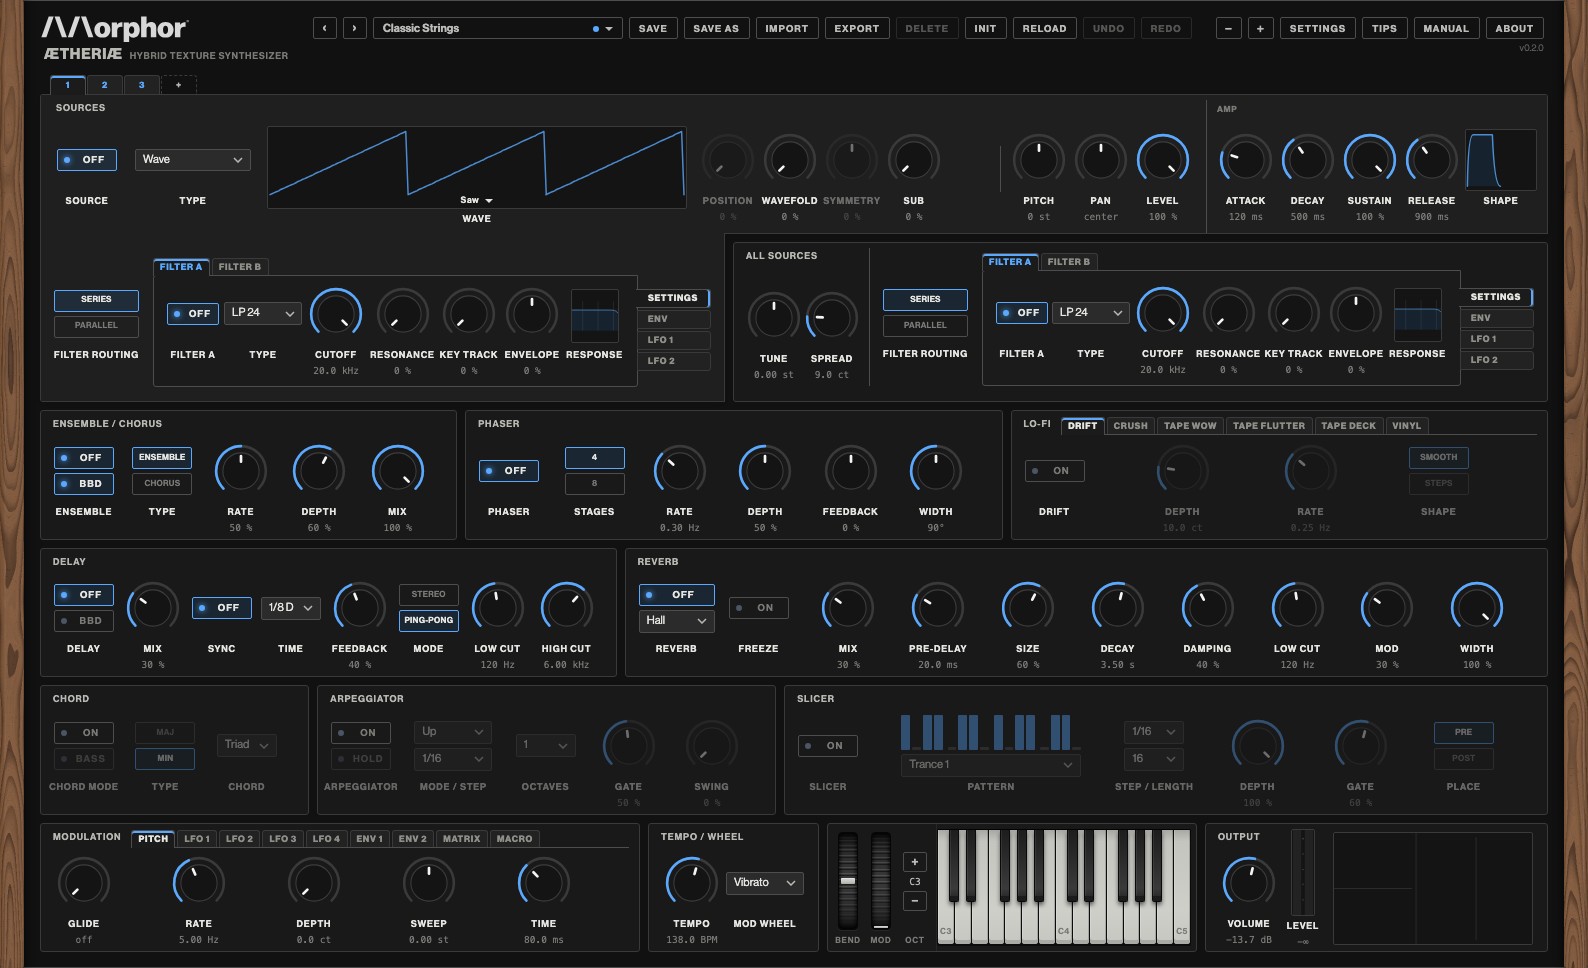
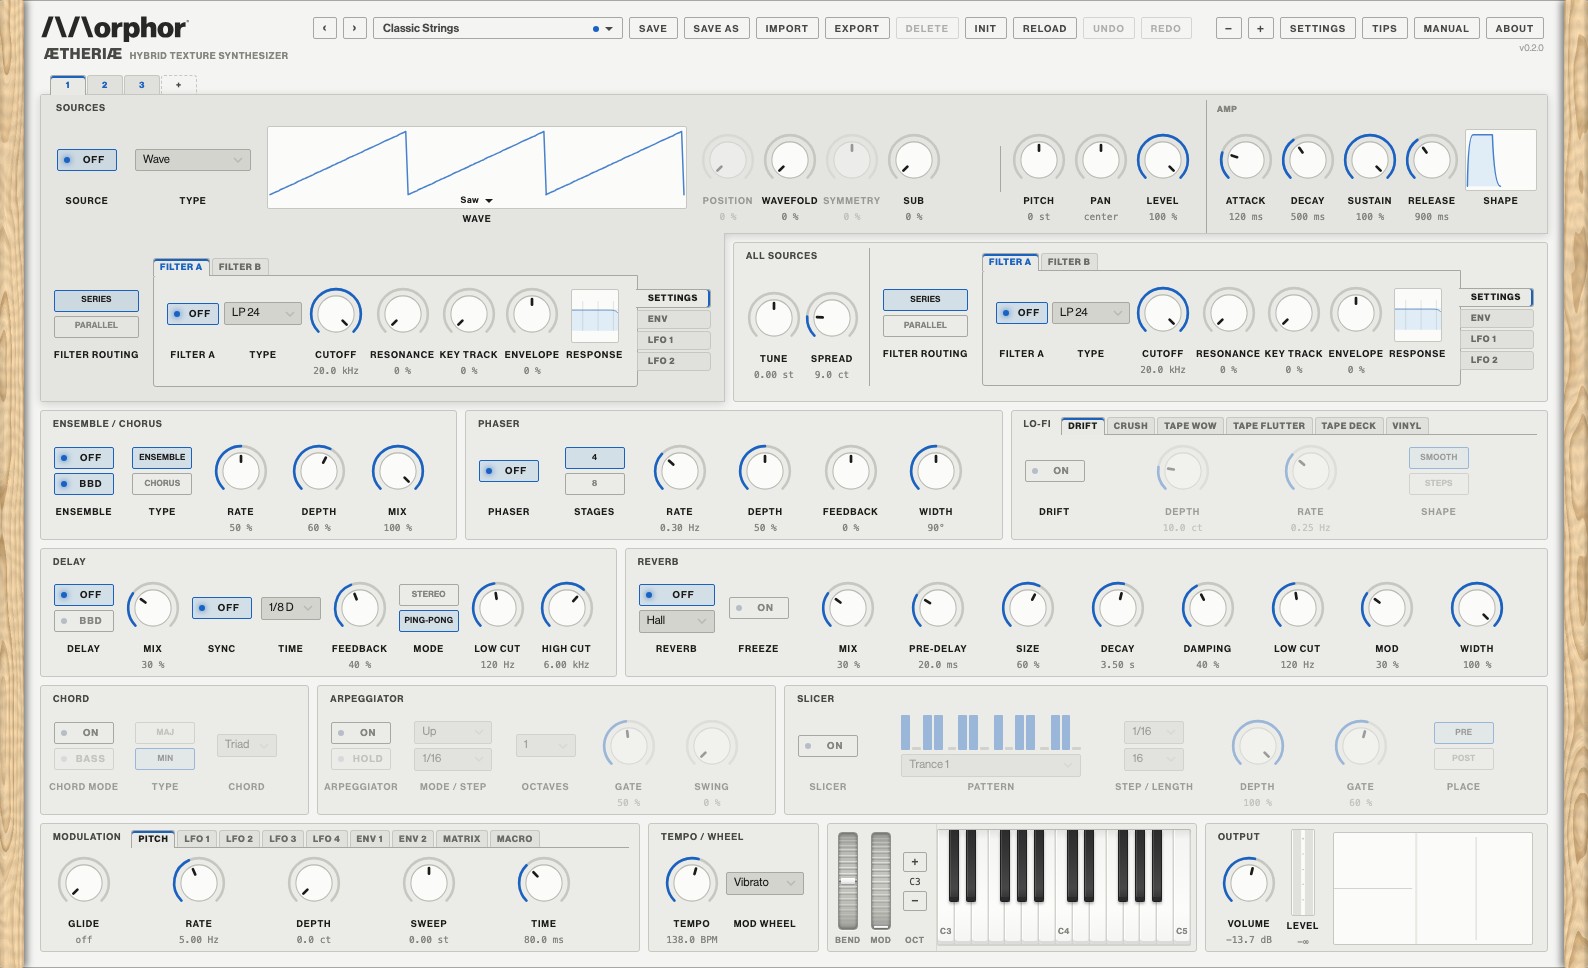
The whole instrument, in the Dark 3D theme with its walnut side panels
Formats
Aetheriae comes as a VST3, AU and CLAP plugin and as a standalone app, for macOS and Windows, and as a browser version that runs in a web page at morphor.io/plugins/aetheriae/web. All three play the same sound; how they differ is in Plugin, app and browser.
Installing
Download the installer for your computer from morphor.io/plugins/aetheriae: one for macOS (Apple silicon and Intel, macOS 11 or later) and one for Windows (x64 and Arm64, Windows 10 or 11).
On macOS open the disk image and run the installer in it: choose the formats you want, and it puts the plugins in the Audio/Plug-Ins folders of the Library (Components for the AU, VST3, CLAP) and the app in Applications. The uninstaller beside it takes everything away again. On Windows run the installer: the VST3 goes in Common Files\VST3, the CLAP in Common Files\CLAP and the app in Program Files; it fetches Microsoft's WebView2, which draws the panel, where Windows does not have it yet. Restart your DAW, or let it scan for new plugins, and Aetheriae appears under Morphor.
Where your files live
Your presets, settings, wavetables and samples are kept in one folder in your application data, shared by every format: on macOS ~/Library/Application Support/Morphor/Aetheriae, on Windows %APPDATA%\Morphor\Aetheriae. Settings, Presets shows the presets folder; the Samples and Wavetables folders open from Settings, General.
Features
Aetheriae is a hybrid texture synthesizer: wavetables, samples, FM, phase distortion, physical models and noise, layered in every voice, each layer shaped on its own, then through a string machine's ensemble, worn tape and a deep reverb. It is made for evolving pads, strings and choirs, plucks and bells, lo-fi drones and textures, with its roots in the string machines of the seventies.
Sound sources
Up to eight sources in every voice, each one a complete strand: its own sound, two filters and an amplifier envelope, its own pitch, level and pan.
Six kinds of source, mixed freely in one sound:
Wave: the classic waveforms (saw, square, triangle, sine), white and pink noise, and 33 built-in wavetables, from filter sweeps and formants to bells, metal and strings, each band-limited for a clean top at every pitch. Pulse width on the square, a wavefolder with symmetry on every wave, and your own wavetable files.
Sample: any recording, played as a one-shot, in a seamless loop, or as a cloud of grains (grain size, density and spray). 69 factory samples (orchestral and folk instruments, voices, pianos, drums, sound effects, all public domain or CC0), and your own audio files.
FM: six sine operators in phase modulation, ten algorithms, and eight macros (carrier and modulator ratios, index, harmonics, feedback, detune, mix and the modulators' envelope), with harmonic, free or fixed ratios and velocity.
Phase distortion: the Casio CZ's way of bending a cosine, eight shapes (two at once), amount, resonance and skew, its own DCW envelope, every setting as loud as a sine and alias-free up the keyboard.
Resonator: physical models of what rings, a modal bank of 32 partials (strings, bars, bells, plates, membranes) or a waveguide string, set ringing by seven exciters (impulse, noise, mallet, pluck, blow, particles, bow) or by another source's sound; brightness, damping, structure and strike position; a bucket-brigade string and an inverted (odd-harmonic) string.
Air: noise as a source, white, pink, a breath band or a digital grain, with colour and key tracking: the breath of a choir, the bow noise of strings.
Tune and Spread for the whole sound: one turn of Spread detunes the sources against one another, from a gentle beating to a supersaw.
Filters
Two filters on every source and two more on the sum (the master filter), each pair in series or in parallel.
Ten filter types in every filter: 24 and 12 dB lowpass, bandpass, highpass, notch, peak, low and high shelf, all-pass (a phase shifter: every frequency turned by the same angle; kept turning by an LFO, a frequency shifter) and Vox, a vowel (or formant) filter that sings from A to U, with formant shift and its own mix.
Cutoff, resonance, key tracking and envelope amount, with a live drawing of the response.
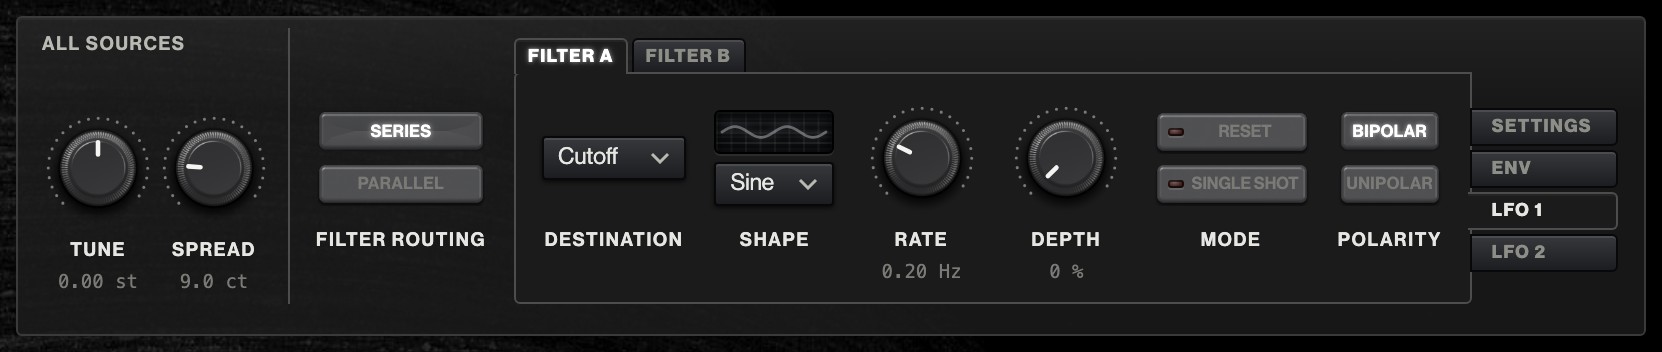
Every filter has its own ADSR envelope and two LFOs (to the cutoff, resonance, key tracking or envelope amount; seven shapes, key reset, single shot, bipolar or unipolar).
Envelopes
An amplifier envelope on every source, so one layer can swell slowly under another that strikes at once.
A curve for every slope of every drawn envelope (the amp's, the filters', Env 1 and 2): linear, logarithmic or exponential for the attack, the decay and the release, chosen by a right-click on the slope.
Attacks up to 20 seconds, releases up to 30.
Modulation
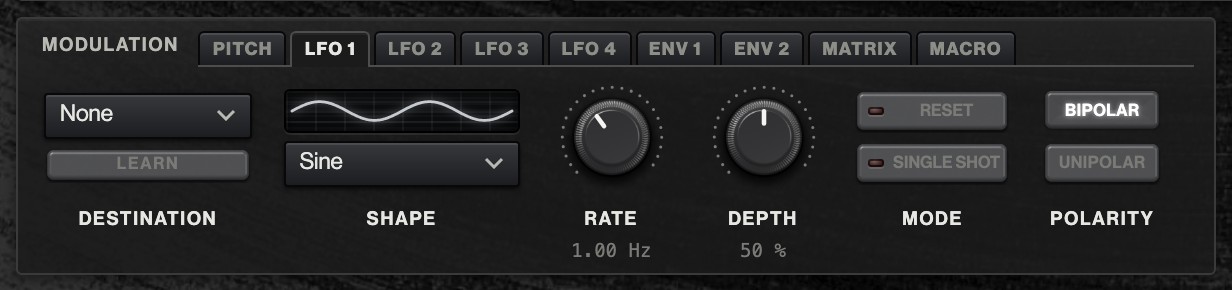
Four LFOs (seven shapes, from sine to smooth random; key reset, single shot, bipolar or unipolar) and two envelopes, each to any continuous control, chosen from a menu or by Learn.
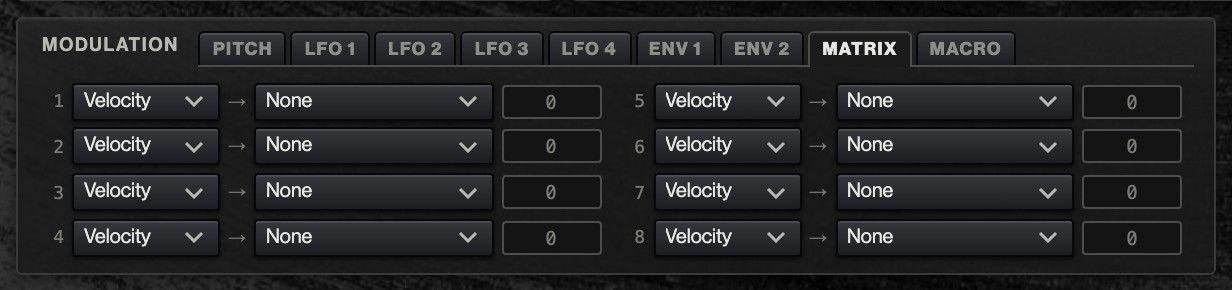
A matrix of eight rows: velocity, aftertouch, the key played, the mod wheel, the LFOs and the envelopes, each to any destination, at any amount either way.
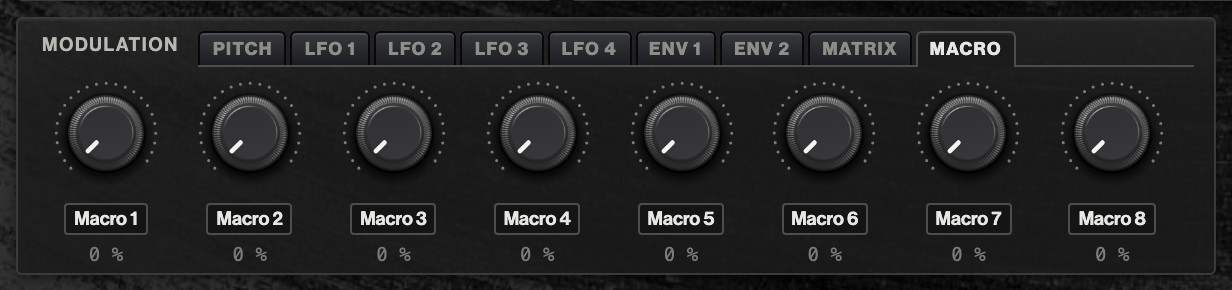
Eight macros, each moving up to 16 controls at once, in any direction and any amount, renamable and automatable from the DAW.
Per-voice modulation of the sources' level, pitch, pan and position and of every filter's cutoff, resonance, key tracking and envelope amount: every note moves on its own.
Modulation shown on the controls: every moved knob shows where it is being taken, live.
Glide, vibrato, pitch sweep, pitch bend and a mod wheel with fourteen destinations.
Effects
Ensemble and chorus: the string machine's three-line ensemble with its slow and fast LFOs, or a classic chorus, both with a bucket-brigade chip model.
Phaser: four or eight stages, feedback and stereo width.
Lo-fi: wow, flutter, bit and sample-rate crushing, a cassette or VHS tape (saturation, hiss, dropouts, head bump), a vinyl record (crackle, surface noise, wear) and analogue drift in every voice; each placed before the ensemble, after the phaser, or at the very end.
Slicer: a sixteen-step rhythmic gate with thirteen patterns, before or after the delay and reverb.
Delay: stereo or ping-pong, synced or free, filtered repeats, and a bucket-brigade echo whose chip suits the time.
Reverb: a dense hall, a shimmer that climbs in octaves or fifths, and a spring tank, with Freeze.
Every effect leaves the sound untouched, to the bit, when it is off.
Playing
Sixteen voices, with the oldest fading one taken over smoothly when they run out.
Arpeggiator: seven modes (up, down, up-down, down-up, random, as played, chord), synced rates, gate, swing, octaves and hold.
Chord mode: one key plays a whole chord (seven shapes, major or minor, with or without a bass note), arpeggiated if you like.
The notes played go out as MIDI, for a DAW to record or another instrument to follow.
An on-screen keyboard with pitch and mod wheels, and the computer keyboard as a piano, on any keyboard layout.
Presets
282 factory presets in eighteen categories, from pads, strings and choirs to keys, bells, plucks, basses and a whole drum kit, each levelled to sit together.
Your own presets in packs, with author, category and description; browse by category, author or pack, or search by name or author.
Save to a file and load single presets and whole packs, to share or to back up.
Undo and redo for every change, Reload to compare with the saved sound, and a mark on every knob showing where it was when the preset was loaded.
Looks
Thirteen themes: four flat and nine 3D, from dark and light hardware to a vintage cream, silver and black racks, a red machine, champagne gold and a Soviet-institute instrument with chicken-head knobs, bakelite keys and incandescent lamps.
Your own accent and lamp colours on any theme, always in a shade that reads.
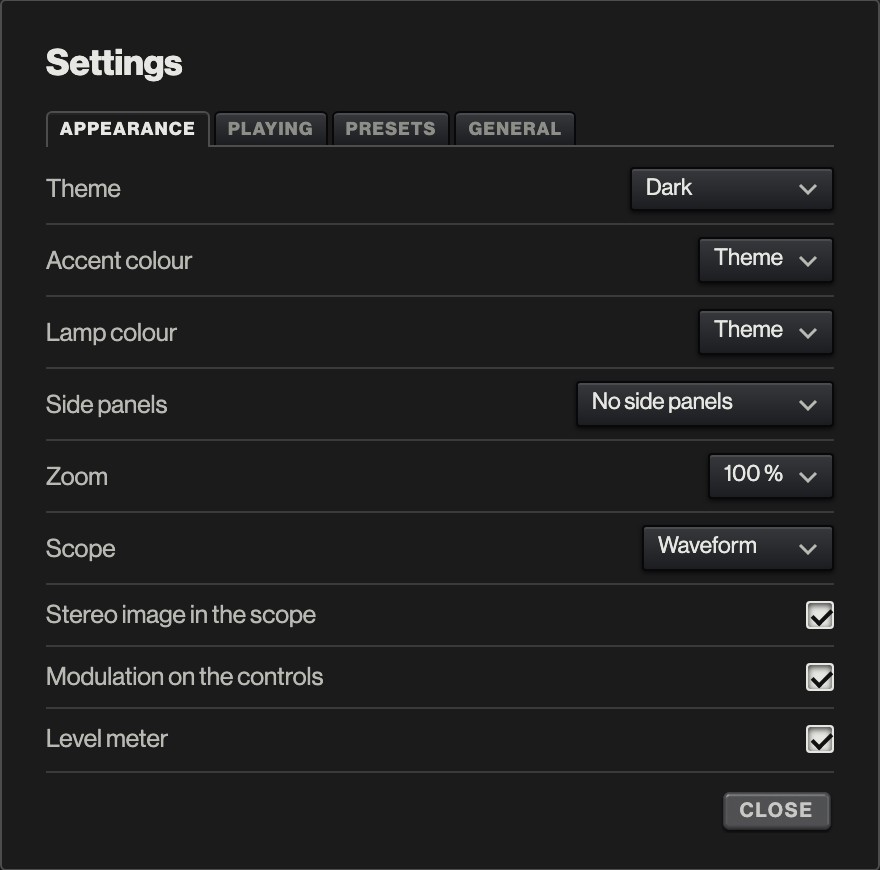
Wooden or metal side panels, zoom from 50 % to 200 %, and a scope with waveform, spectrum, waterfall and 3D waveform views, a stereo image and a level meter.
Tooltips on every control, and this manual, built in.
Formats
VST3, AU and CLAP plugins and a standalone app, for macOS (Apple silicon and Intel) and Windows (x64 and Arm64): the downloads are at morphor.io/plugins/aetheriae.
A browser version that plays in a web browser, on a computer, a tablet or a phone, with MIDI where the browser has it.
Projects keep everything: the sound, the files its sources play, its modulation and its macros.
Plugin, app and browser
Aetheriae comes three ways: as a plugin inside a DAW, as a standalone app on its own, and as a browser version in a web page. All three are the same instrument, the same engine making the same sound from the same presets; what differs is where they live, how they reach your audio and MIDI, and where they keep your sounds.
Plugin (VST3, AU, CLAP)
Standalone app
Browser version
Runs in
your DAW, on a track
its own window
a web page, at morphor.io/plugins/aetheriae/web
Audio and MIDI
through the DAW: its tracks, its MIDI routing, its audio device
its own audio and MIDI settings (menu, Audio settings)
the browser's: its default audio output, MIDI keyboards the browser lets it use
Tempo
the song's, so the arpeggiator, the slicer and synced delays follow it
its own Tempo knob
its own Tempo knob
Several at once
as many instances as you like, each its own sound, saved with the song
one
one per browser tab
Automation
every control, recorded and played by the DAW
none
none
MIDI out
the arpeggiator's and the chord mode's notes go to the DAW
to a MIDI port
none
Your presets, samples and wavetables
the Morphor/Aetheriae folder, shared with the app
the same folder, shared with the plugin
the browser's own storage, for that browser only
Audio buffer
the DAW's audio settings
the app's audio settings
Settings, Playing, Audio buffer
Works offline
yes
yes
once the page has loaded
The manual
inside the plugin, offline (Manual button)
inside the app, offline
beside the page, online
Which to use
Use the plugin to make music: it lives in your songs, records and plays automation, follows the tempo, and every instance keeps its own sound with the project. Use the standalone app to play or design sounds without a DAW, from a MIDI keyboard. Use the browser version to try Aetheriae, or to play it on a computer where nothing is installed: nothing to install, nothing to update.
Moving sounds between them
The plugin and the app share one folder, so a preset saved in one is there in the other. The browser version keeps its own: to move presets to or from it, save a preset or a whole pack to a file (Save as, Save to a file…) and Load it on the other side (see Presets).
Getting started
A first sound
Open Aetheriae on an instrument track and play. Every new instance starts at Init: a single sine wave, dry, the simplest sound there is. Turn a few knobs while a note sounds to hear what they do; double-click any knob to put it back where it was.
Presets
The top bar: the presets, their buttons, the zoom, Settings, Tips, Manual and About
The preset bar along the top holds the factory presets and your own. Click the preset's name to open the menu: presets are grouped by category, and the field at its top finds one by name or author as you type. The arrows beside the name (or the left and right arrow keys) step through them.
A dot beside the name means the sound was changed since it was loaded. Reload brings back the preset as it was saved, Undo and Redo step through your changes.
Playing without a keyboard
Click or drag on the keyboard at the bottom to play. With Settings, Playing, Computer keyboard plays notes on, your computer keyboard plays too: the home row and the row above it are a piano octave and a bit, and the two keys left of the bottom row move it an octave down or up. It plays by where the keys are, so it works the same on every keyboard layout.
Tooltips
Hold the pointer over any control and a tooltip explains it. The Tips button, or Shift+T, turns them off when you know your way, and back on. Settings, General sets how soon they appear.
The panel
The panel is laid out as the sound flows: the sources at the top, each with its filters and amplifier envelope under it; in the corner beside them All sources and the master filter; then the effects, the playing aids (chord, arpeggiator, slicer), the modulation, and the keyboard with the output at the bottom. The next chapter, How Aetheriae makes its sound, follows a note along that way.
Sections and their switches
Most sections have their own switch at their start: off, the section does nothing at all and costs nothing, and its other controls are dimmed. A switch's key says what pressing it does: On while the section is off, Off while it is on; its LED is lit while it is on. The effects are off when a new instance starts; their amounts are set to something worth hearing, so switching one on is enough to hear it. Each filter has a switch of its own too, at the start of its Settings tab.
Tabs
A section with more controls than fit shows them on tabs: the sources (a tab for each), lo-fi (an effect each) and modulation. A tab's name is in colour while what it holds is doing something.
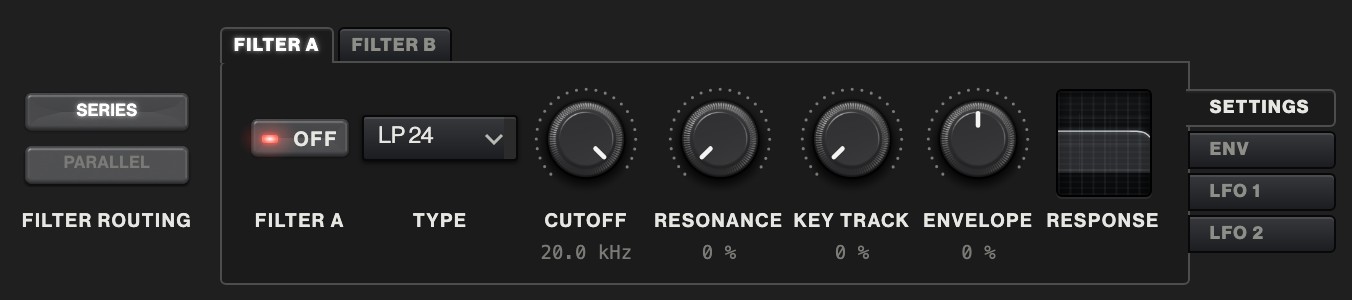
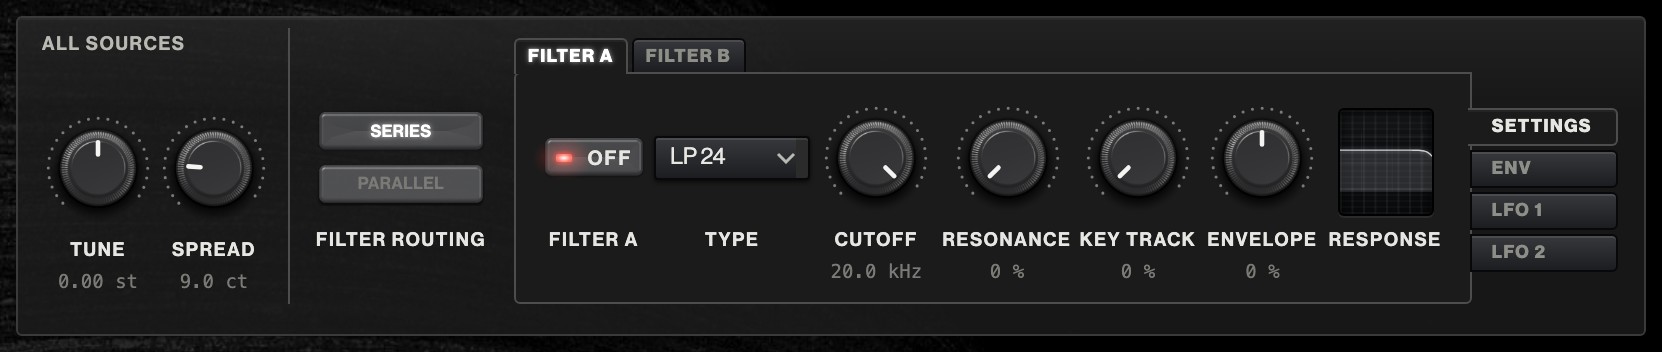
The sources' tabs stand on the Sources section's top edge, outside it, since each holds the whole section: the source, its amp envelope and its filters. A source's tab is in two halves. Above is the source itself: its Type menu, its display, its controls, and Pitch, Pan and Level. Below it, at the left under the heading Filters, are the source's two filters on the tabs Filter A and Filter B, with the Filter routing switch (Series over Parallel) first in their row; its amplifier envelope is at the top right, after Pitch, Pan and Level, under the caption Amp, always in view. Inside a filter's tab are four more tabs, upright at the right end of its row: Settings (its switch, then Type, Cutoff, Resonance, Key track and Envelope, with the Response drawing), Env (its ADSR and the shape drawn), LFO 1 and LFO 2. The master filter, on the sum of the sources, is part of the All sources section, in the corner beside the source's filters; it has the same tabs, Filter A and Filter B, with their Filter routing switch.
Knobs, menus and switches
Drag a knob up or down to turn it; hold Shift to turn it finely.
Scroll over a knob to turn it; with Shift, finely.
Double-click a knob, a bar or a wheel to put it back at its default.
A small mark on a knob's ring shows where it was when the preset was loaded.
Right-click a slope in an envelope's drawing to choose its curve (Lin, Log or Exp); the slope is shaded while its menu is open.
On a touch screen, press and hold a control for its right-click menu, and double-tap a knob to put it back at its default.
The top bar
Beside the presets: Load (a preset or a pack from a file), Save (over your own preset; a factory one is saved under a new name), Save as (with Save to a file… in its dialog), Init (every control back at its default), Reload, Undo and Redo. At the right: the zoom (− and +), Settings, Tips, Manual and About.
How Aetheriae makes its sound
This chapter follows one note from the key you press to the sound that leaves the instrument, station by station, in the order Aetheriae works. It explains what each stage does, why it is there and how it changes the sound, so you can build a sound on purpose. The chapters after it describe each section's controls in detail.
In short: Aetheriae is a synthesizer that layers up to eight sound sources in every voice. Each source can be a waveform or wavetable, a recorded sample, FM, phase distortion, a physical resonator or a breath of noise (Air), which puts a myriad of synthesis options side by side in one note. Each source has two filters and an amplifier envelope of its own, so every layer can be shaped on its own; the sources are then summed and go through the voice's master filter, two more. All the voices then come together and pass through a chain of effects: worn-tape and record effects, the string machine's ensemble or a chorus, a phaser, a rhythmic slicer, a delay and a reverb.
Signal path
Before the voices: keys, arpeggiator and chord mode
A note starts at a key: a MIDI keyboard, the keyboard on the panel or your computer keyboard. Before it reaches a voice it can pass two playing aids.
The arpeggiator comes first. When it is on, the keys you hold are not played directly; it plays them one after another, in time with the song (or the Tempo knob), up, down, at random or in the order you pressed them. Chord mode comes next: every note that reaches it, from a key or from the arpeggiator, becomes a whole chord, so an arpeggio of single keys becomes an arpeggio of chords. The notes as they come out of the keys or the arpeggiator, before chord mode, also go out as MIDI, so a DAW can record them or another instrument can play along.
Each note then takes a voice. Aetheriae has sixteen: a chord of four in chord mode uses four of them for a single key. When all sixteen are busy, a new note takes over the oldest voice that is already fading, or else the oldest of all, and carries on from its level, so it does not click.
How hard you strike a key (velocity) does not change the volume, as on the string machines Aetheriae comes from. It brightens the FM and phase distortion sources as far as their own Velocity settings say, and it can move anything else through the modulation matrix.
In each voice: the sources
Every voice holds its own copy of everything up to the master filter: its own sources, each with its filters and its envelope, and its own master filter. That is why a chord of eight notes sounds like eight instruments playing together and not like one instrument made louder.
Up to eight sources
A voice plays the sources that are on, up to eight, all at the note's pitch, and adds them together. Each source is one of six kinds, its Type:
Wave: a waveform (sine, saw, square, triangle, noise) or a wavetable, a row of waveforms to move through. The classic way synthesizers make sound.
Sample: a recording, played at the pitch of the key, whole, in a loop, or as a cloud of tiny grains.
FM: six sine waves modulating one another, the technique of the Yamaha DX7: bells, electric pianos, glassy and metallic tones.
Phase distortion: a cosine whose cycle is bent out of shape, the technique of the Casio CZ: a sine that opens up like a filter.
Resonator: a physical model of something that rings (a string, a bar, a bell, a membrane) and what sets it ringing: a strike, a pluck, a breath, a bow, or another source's sound.
Air: noise, white, pink, a band of breath or a digital grain, where you want it in the spectrum: the breath of a choir, the bow noise of strings, the hiss of an old string machine's circuits.
The chapter Sources explains each of them in depth. Here, what matters is how they combine. Each source has its own Pitch (in semitones, up to two octaves either way), Level and Pan (where it sits between left and right). The voice stays in stereo from here on: a source panned to the left stays on the left all the way to the output.
The sources are mixed so that a voice is about as loud with one source as with many: the more sources, the lower each one is mixed in, so you can add layers without the level running away. An Air source is not counted: a breath of air added to a pad leaves the other layers where they were, at a level of its own.
Tune and Spread: one sound or many
Tune moves every source together, up to an octave either way: the instrument's master tuning.
Spread is where layering becomes something more. It detunes the sources against one another, evenly from flat to sharp, up to 50 cents either way: the first source stays in the middle and the others fan out alternately above and below it, the outermost ones at the full amount. Two waves at almost the same pitch drift in and out of step with each other, a slow beating that the ear hears as width and movement, as when several violins play the same note.
This is the idea behind two famous sounds:
The supersaw. Roland's JP-8000 made its Super Saw from seven sawtooth waves slightly out of tune with each other: the huge, shimmering lead and pad of trance music. In Aetheriae, add seven Wave sources, all Saw, and turn up Spread; a little goes a long way (10 to 20 cents is already wide). Pan a few of them apart for a wider stereo picture.
The string machine. The string ensembles of the seventies, such as the Solina String Ensemble, mixed a few registers of simple waves, an octave apart, and then put the result through an ensemble: delay lines swept by slow and fast LFOs, which turn one tone into a section. In Aetheriae: two or three Saw sources, one with its Pitch at +12 or −12, a few cents of Spread, and the Ensemble switched on.
When a voice starts from silence, its sources start in step, so with no Spread they add up to one clean waveform; with Spread they drift apart from there, which gives every note a short, natural "bloom" as the beating sets in. Spread detunes samples too: two sources on the same recording drift apart into a chorus.
Pitch: glide, vibrato, sweep and drift
Before a source sounds, the voice works out the note's pitch. Glide slides it in from the note played before. Sweep starts each note a number of semitones above or below and lets it fall into place, the way a drum's pitch drops when it is struck. Vibrato and the pitch wheel move it for all voices together.
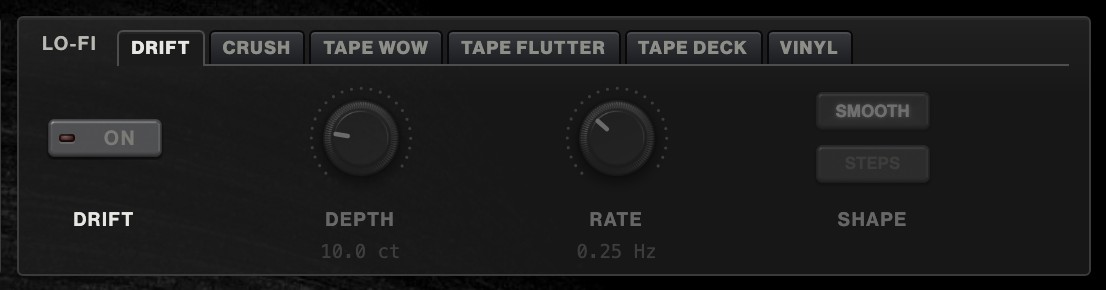
Drift, on the lo-fi section's Drift tab, acts here, in each voice: every voice wanders slightly out of tune in its own slow way, as the oscillators of an old analogue synthesizer do. A chord detunes against itself, and no two notes are quite alike. It sits on the lo-fi tabs because it is a kind of wear, but it is the only lo-fi effect that lives inside the voices.
Air: the breath among the sources
An Air source is noise, beside the others. It is a source like any other, so it goes through its own filters and amplifier envelope, at its own Level and Pan, and swells and fades with every note; the ensemble and phaser then treat it with the rest. That is what makes it sound like part of the instrument rather than a hiss laid on top: the breath of a choir, the bow noise of strings, the hiss of an old string machine's circuits.
Each voice has its own noise generator, so the noise of a chord is as wide as the chord. Air has four kinds of Noise:
White: plain hiss, everything above the Colour frequency.
Pink: noise that is softer on top and has more body, also above the Colour frequency.
Breath: a band of noise around the Colour frequency, like air blown through a pipe or between the lips.
Grain: noise held in small steps at a rate set by Colour, a digital rasp.
Colour says where the noise sits, from 300 Hz (a wide, low hiss) to 8 kHz (only the very top). Track makes the Colour follow the keys: at 0 % every note has the same noise; at 100 % an octave up the keyboard moves the colour an octave up, so the noise takes on a pitch of its own (try it with Breath, for a flute-like chiff). The source's Level is how much of it you hear; its Pitch does nothing to noise.
Each source's filters: shaping the tone
Now each source passes its own two filters, Filter A and Filter B. This is subtractive synthesis, the oldest idea in synthesizers: start from a sound rich in harmonics, such as a saw, and take away what you do not want. A filter sweeping down over a saw is the sound of the Minimoog and of countless analogue synthesizers since.
Every source in every voice has its own pair, so each layer of each note can be filtered differently: a dark pad under a bright pluck, a sample with its rumble cut, a choir with a vowel of its own. A source's filters work on the source's own signal, before its amplifier envelope, level and pan. The Filter routing switch says how the two are joined: in Series the sound goes through Filter A and then through Filter B (a lowpass and then a highpass make a band, two lowpasses a steeper slope); in Parallel it goes through both side by side and the two are added (a lowpass and a highpass beside each other leave the lows and the highs and take the middle away). A filter that is switched off is left out either way, so one filter alone is simply one filter.
Each filter's Type is:
LP 24: a lowpass that cuts steeply (24 dB an octave) above the cutoff: dark, round, the classic synthesizer sound.
LP 12: a gentler lowpass (12 dB an octave): brighter and more open, letting more of the harmonics through.
BP: a band around the cutoff only: thin, nasal, telephone-like.
HP: a highpass, taking away what is below the cutoff: for thinning out a pad or removing rumble.
Notch: the opposite of a bandpass: it takes a band around the cutoff away and leaves the rest. On its own a single notch is subtle; swept, it is the hollow movement of a phaser, and two in series dig a deeper hole.
Peak: a bell that raises or lowers the band around the cutoff, as a parametric equaliser's band does. The Resonance knob becomes its Gain, up to 18 dB either way with 0 dB in the middle; the bell's width is fixed. For bringing out a formant, a nasal honk, or taking a harsh band down.
Low shelf and High shelf: raise or lower everything below, or above, the cutoff, as the bass and treble of a tone control. The knob is the Gain again. For warming or thinning a layer without the resonant character of a lowpass.
All-pass: a phase shifter. It lets every frequency through at its level and turns them all by the same angle, set by its one knob, Phase (0 to 360 degrees; 180 is the sound upside down). Held still, the ear hears little of it: the wave changes shape, which shows mostly on attacks, and beside the other filter, in Parallel, the two add up where their phases meet and cancel where they are opposite. Turned by one of the filter's LFOs it comes alive: a Saw up at full depth, Unipolar, turns it round and round, which shifts every frequency of the sound by the LFO's rate, as the old frequency shifters did. A few hertz is a slow, beating shimmer; more is metallic and inharmonic, as the shift is the same number of hertz for every partial.
Vox: a vowel filter, also called a formant filter. Three narrow resonances stand where the first three formants of a sung vowel are, the peaks in a voice's spectrum that the ear hears as A, E, I, O or U. The Cutoff knob becomes Vowel, moving through the five vowels across its range and gliding from one to the next; the Resonance knob becomes Shift, which moves the formants up or down by up to an octave, a smaller or larger voice, with the middle as sung. Put strings through it and they begin to sing: the old string machines' "choir" and "vox humana" sounds work this way. The Key track knob becomes Mix, how much of the vowel is heard. The envelope moves the vowel as it would a cutoff, and an LFO on the cutoff sways it from vowel to vowel.
Cutoff is the frequency where the filter starts to take the sound away (or where a peak, a shelf or a notch sits), from 20 Hz to 20 kHz. A lowpass at the very top is out of the way altogether, and so is a filter with its switch off. Resonance emphasises the sound right at the cutoff, from a soft bump to a sharp, whistling peak: it gives a sweep its vocal, wah-like quality. (For a peak or a shelf the knob is the gain, for Vox the shift, as above; switching to one of those with the knob at its left end puts it in the middle, so nothing jumps.) The Response display draws what the filter does, whatever its type.
Key track lets the cutoff follow the keys up from middle C and down below it. At 0 % every note is filtered at the same frequency, so high notes sound darker than low ones; at 100 % the cutoff moves with the note, and every note keeps the same tone.
Each filter has its own envelope (its Envelope tab: attack, decay, sustain and release), started by every note. Envelope on the filter's Settings tab says how far it moves the cutoff, up to eight octaves, upwards or (below zero) downwards. A quick decay with a fair amount of envelope is a pluck: bright at the strike, darkening at once. A slow attack opens the sound gradually, as a pad swells.
Two LFOs, LFO 1 and LFO 2, move each filter's settings slowly and steadily: each one the cutoff (up to four octaves either way), the resonance, the key tracking or the envelope's amount. They run once for all the voices, so every note moves together; Reset starts them again with each note, Single shot runs them once per note like an envelope. The master filter below has the same pair, with the same tabs; see The master filter.
Each source's amplifier envelope: the shape in time
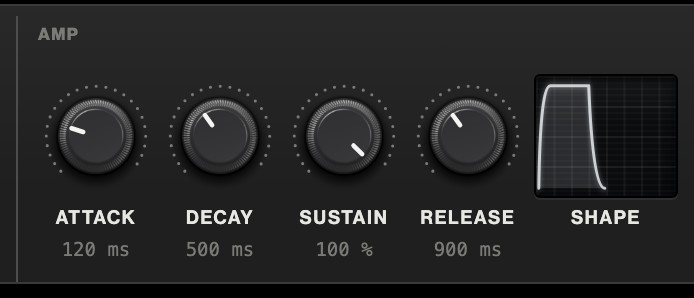
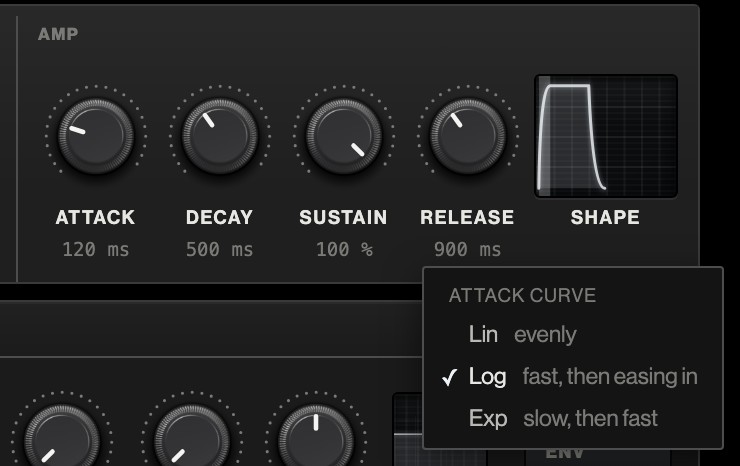
After its filters, each source passes its own amp envelope (the Amp part, at the top right of the source's tab), which shapes its level from the moment the key goes down until the sound has faded after it comes up: Attack (how long it takes to swell in, up to 20 seconds), Decay (how long it takes to fall to the sustain level), Sustain (the level held while the key is down) and Release (how long it fades after the key comes up, up to 30 seconds). Because every source has one, a layer may swell in slowly under another that strikes at once: a pluck that opens into a pad, a breath of air that comes in late.
Each slope has a curve, chosen by right-clicking it in the envelope's drawing: for the attack, Lin rises evenly, Log rises fast and then eases in (as an analogue envelope charges: the default), Exp starts slowly and blooms late; for the decay and the release, Exp falls fast and then levels out (the default, as an analogue envelope discharges), Lin falls evenly, Log falls slowly and then fast. The drawing shows each slope as its curve makes it.
A long attack and release make a pad; zero attack, a short decay and no sustain make a pluck or a hit. A note is over when the longest of its sources' releases has faded to silence; then its voice is free again.
The master filter: the voice as a whole
The sources, each shaped and panned, are added together, and the sum passes the voice's master filter: two more filters, Filter A and Filter B, with a Filter routing switch, built exactly as a source's are (the same types, each with its envelope and its LFO 1 and 2). Where a source's filters shape a layer, these shape the note: a lowpass sweep over the whole chord, a vowel over a mix of layers, a highpass that thins everything together. They run in stereo, so a source panned left is filtered where it stands.
This is the end of the voice. Everything after it happens once, to the sum of all the voices together, in stereo.
The effects, in order
The effects are where much of Aetheriae's character comes from: the swirl of a string ensemble, the wear of an old tape, the space of a hall. Each has a switch, and each leaves the sound exactly as it was when it is off. They run in this order, the order of the drawing above; the chapter Effects describes their controls.
Lo-fi, placed Pre
First come the lo-fi effects that are set to Pre. Five of them can sit in one of three places: Wow (a slow waver of the pitch, as a tape or record whose speed is not quite steady), Flutter (the same, fast: a tremble), Crush (fewer bits and a lower sample rate, the grain of an early sampler), Tape (a cassette or VHS deck's saturation, hiss and dropouts: see How the tape is simulated) and Vinyl (a record's crackle, surface noise and wear). Each has its own Place:
Pre: here, before the ensemble and the phaser. The sound is worn first, as if the instrument had been sampled or taped, and the ensemble then plays the worn sound back and softens it.
Post: after the phaser (the default for all but vinyl). The sound with its ensemble and phaser goes onto the tape.
Out: at the very end, after the delay and reverb (vinyl's default). Everything, the echoes and the tail included, sounds as if the finished track were playing from a cassette or a record.
At any one place they run in the same order: wow, flutter, crush, tape, then vinyl.
Ensemble or chorus: the section
Then the ensemble, the heart of the string machine. It copies the sound into three short delay lines on each side and sweeps their lengths with two LFOs at once, a slow one and a fast one, the three lines a third of a cycle apart, and the right side behind the left. A delay line whose length moves bends the pitch of what passes through it a little, so the three copies are always slightly out of tune with each other and with the dry sound, in a constantly moving way: one tone turns into a whole string section, wide in stereo even from a single, centred note. This is the circuit that made the Solina and its kin sound as they do.
Chorus, its other Type, is a calmer movement: one line per side and one LFO, the two sides moving in opposite directions, as in the chorus of a classic polysynth.
In the originals these delay lines were bucket-brigade chips (BBDs): analogue chips that pass the sound along a chain of tiny capacitors, like buckets of water passed hand to hand. They darken the sound, saturate a little and add a faint hiss. BBD makes the lines sound like those chips: 512 stages for the ensemble, as in the string machines, 256 for the chorus. How Aetheriae models the chips is told in Under the hood. Mix blends the effect with the dry sound.
Phaser: the swirl
The phaser passes the sound through a chain of four or eight all-pass stages, which shift its phase by different amounts at different frequencies. Mixed back with the dry sound, this cuts notches into the spectrum, and an LFO sweeps them up and down: the swirling, jet-like movement of the seventies' string and electric piano sounds. Feedback sharpens the notches, and Width sets how far the right channel's sweep runs behind the left's, for a sweep that moves across the stereo picture.
Lo-fi, placed Post
Here the lo-fi effects placed Post do their work: by default, everything but vinyl. The sound arrives complete, with its ensemble and phaser, and is worn as if it had been recorded onto tape.
Slicer, placed Pre
The slicer cuts the sound in time with the song by a pattern of up to sixteen steps, each with its own level: a rhythmic gate that turns a held chord into a pulse. Placed Pre (the default), it sits here, before the delay and reverb, so every chop gets its own echoes and its own tail, and the rhythm blurs gently into the space. (On the panel it sits with the arpeggiator and chord mode, the other playing aids.)
Delay: the echoes
The delay repeats the sound, as a stereo echo (each side on its own) or as Ping-pong (the repeats bouncing from left to right). Its time is a note value at the song's tempo (Sync) or free, in milliseconds; when it changes it glides, like a tape echo whose speed is turned. Feedback is how much of each repeat comes round again; Low cut and High cut thin and darken the repeats a little more with every pass, as on a real echo, so they fade into the background. BBD makes it a bucket-brigade echo, the chip chosen to suit the time, as an echo of that length would have been built: the longer the time, the darker the repeats. Up to half way, Mix adds the repeats to the sound; beyond that, the dry sound makes room for them.
Reverb: the space
The reverb puts the sound in a space. Its three types:
Hall: a dense, smooth room, from small to very large (Size), made of eight delay lines feeding each other through a diffuser that turns every sound into thousands of echoes at once, so the tail is smooth from its first moment.
Shimmer: the same hall with its tail pitched up (an octave, a fifth or two octaves, or an octave down) and sent round again, so every echo climbs higher than the last: the glowing halo of ambient music.
Spring: a spring tank, as in guitar amplifiers and dub, with three springs. A spring does not carry every frequency at the same speed, so every sound comes back smeared into a little chirp, the highs before the lows: the "drip" and "boing" of a spring reverb.
Freeze holds what the reverb is ringing for as long as it is on: nothing fades and nothing new goes in. Freeze a chord, then play over it: what you play is heard dry, in front of the frozen cloud. Width sets the reverb's stereo width, from mono to full, and Mix works as the delay's does.
Slicer placed Post, and lo-fi placed Out
Placed Post, the slicer comes here instead: after the reverb, it cuts the echoes and the tail as well, for a hard stutter.
Then the lo-fi effects placed Out: by default the vinyl. They act on everything, echoes and reverb included, as the last thing before the output: the whole track on a worn record.
Volume: the output
Last, the Volume knob sets the output level. Inside the instrument, the voices are mixed in quietly, so that a full chord of many sources has room and does not distort; 12 dB is made up at the output, before the knob, so that most sounds sit with the knob around −13 dB and still have room above. The meter beside the knob shows the level that leaves the instrument.
Modulation: what moves all of this
All of the above can move while you play. Some movement is built in: every filter's envelope and its LFO 1 and 2, each source's amp envelope, the ensemble's LFOs, the phaser's, the vibrato. Beyond that, the Modulation section can move almost any knob you choose:
LFO 1 to 4: slow, repeating movements (sine, triangle, saw, square, random). There is one of each for all the voices together.
Env 1 and 2: envelopes started again by every note, each running in each voice on its own.
The matrix: eight more routes, from velocity, aftertouch, the key played, the mod wheel, or the LFOs and envelopes at full depth.
Macros: eight knobs, each turning several controls at once.
The mod wheel: vibrato, the filters' cutoff, the sources' position, a Vox filter's vowel, an FM macro or the phase distortion's amount or resonance.
The master filters' cutoff, resonance, key tracking and envelope amount, and each source's position, level, pitch and pan and the same four settings of each of its two filters, are moved in each voice by that voice's own envelopes, velocity and key: every note on its own. Everything else is moved for all voices at once. See Modulation.
A sound, built from the path
To hear the path at work, build a string pad from Init, step by step:
On source 1, choose Saw. Add a second source, also Saw, and set its Pitch to −12. Turn Spread to about 12 ct.
Add a third source and set its Type to Air, Noise Breath, its Level low.
On the master filter's Filter A, choose LP 12, bring Cutoff down to about 3 kHz, and set Key track to 50 %.
In each source's Amp part, set Attack to about 0.6 s and Release to about 1.5 s (pick all three tabs with Shift-click first, and one change sets them all).
Switch on the Ensemble, then the Reverb (Hall, Mix about 30 %).
For a lo-fi tint, switch on Tape and Wow, leaving them at Post.
Every step adds one stage of the path, and each one is easy to hear on its own: switch it off and on again while a chord is held.
Sources
Every voice plays up to eight sources at once. Add one with the + tab; right-click a source's tab to copy, paste, duplicate, reset or remove it. Drag a tab to move a source among the others. Shift-click a tab to pick the sources from the open one to it, Cmd-click (Ctrl-click on Windows) to pick or leave out one more: while several are picked, what you change on the open one is set on all of them.
Each source has a Type: Wave, Sample, FM, Phase distortion, Resonator or Air. Pitch, Pan and Level are at the right of every source, whatever its Type. Under every source's controls are its own two filters (at the left, under the heading Filters) and its own amplifier envelope (at the top right of its tab, after Pitch, Pan and Level) (see Filters and The amp envelope at the end of this chapter): each layer of a note is shaped on its own before it joins the others. Tune and Spread, in the small All sources section beside the source's amp, act on all of them (see How Aetheriae makes its sound for how they combine).
The six Types are six different ways of making a sound, each with its own history and its own strengths. This chapter explains how each one works, so you know which to reach for and what its controls really do.
Harmonics: what a sound is made of
One idea runs through all of them. A note with a pitch, played by almost any instrument, is a sum of sine waves: the fundamental at the note's frequency, and above it the harmonics at two, three, four and more times that frequency. Their levels make the tone: a flute has few and weak harmonics, a violin or a trumpet many and strong ones. The ear hears the fundamental as the pitch and the harmonics as the colour.
Sounds whose components are not whole multiples of the fundamental, such as bells, bars, gongs and drums, are said to have partials rather than harmonics. They sound metallic, bell-like or clangorous, and often their pitch is less certain.
Each Type is a different way of getting to a mix of harmonics or partials: picking a ready-made shape (Wave), recording it (Sample), making it from sines bending each other (FM), bending the shape of a single sine (Phase distortion), or modelling the physical object that rings (Resonator). Air is the exception: noise has every frequency at once and no pitch, which is why it is the breath between the notes rather than a note.
Wave
A Wave source: its wave drawn, Position, Wavefold, Symmetry and Sub, then Pitch, Pan and Level
A waveform or a wavetable, chosen from the wave menu (or with the up and down arrow keys). Position moves through a wavetable's frames, or sets a square's pulse width. Sub adds a sine an octave below. Wavefold folds the wave back on itself for brighter, more metallic overtones, and Symmetry makes it fold unevenly. User plays a wavetable file of your own, from your Wavetables folder. The appendix Waves describes them all.
The basic waveforms
The first synthesizers had a handful of waveforms, and they are still the starting point of most sounds, because each has a recognisable set of harmonics:
Sine: the fundamental alone, no harmonics at all. Pure, soft, flute-like or whistling; the basis of sub basses, kicks and FM.
Triangle: only the odd harmonics, and they fall away fast. Soft and round, a little brighter than a sine.
Square: the odd harmonics, falling more slowly. Hollow and woody, the sound of a clarinet or an old video game. On a square the Position knob becomes Width, its pulse width: from half the cycle (a true square) down to a twentieth (thin and nasal). A narrower pulse brings in the even harmonics too.
Saw: every harmonic, each a little quieter than the one before. Bright, buzzy and full: strings, brass, the classic synthesizer pad and lead. Because it has everything, it is the best starting point for filtering.
Noise and Pink Noise: no pitch at all, every frequency at once: hiss, wind, breath, surf.
Wavetables
A wavetable is a row of waveforms, called frames, that the sound can move through. Position says where in the row the source reads, from the first frame (0 %) to the last (100 %), and between two frames it blends them smoothly. Turning Position while a note plays, or moving it with an LFO, an envelope or the mod wheel, makes the tone change in a way no single waveform can: a filter opening, a vowel changing, drawbars being pulled out, a bell growing brighter. This is the idea of the PPG Wave and the Waldorf synthesizers of the eighties, and of most software synthesizers since.
Aetheriae's own wavetables are made by the program when it starts, each from a recipe of harmonics, eight frames to a table. Filter Sweep, for example, is a saw with its harmonics fading in along the table; Organ pulls out drawbars one after another; Choir moves through sung vowels; Bell and Wood are struck objects, brighter along the table. User reads a wavetable file of your own (a WAV of single cycles, one after another, as most wavetable synthesizers write them); its Position runs through all of its frames, however many it has. Import one from the end of the wave menu; it is copied into your Wavetables folder.
Sub
Sub adds a sine an octave below the source, in the same place between left and right: weight underneath, without muddying the tone. It is the sub-oscillator of many analogue synthesizers. A wave source alone has one; the other Types do not.
Wavefold and Symmetry
Wavefold comes from the "west coast" synthesizers of Don Buchla and his followers, which made bright sounds not by filtering a rich wave but by adding harmonics to a simple one. The wave is driven past its top, and instead of being clipped flat, it folds back on itself; driven harder, it folds again and again. Every fold adds harmonics, so a sine or a triangle turns bright, glassy and sizzling as Wavefold goes up. At 0 the wave is untouched; the fold fades in over the first quarter of the knob.
Symmetry shifts the wave before it folds, so the top and the bottom fold unevenly. A symmetrical fold of a sine or a triangle adds only odd harmonics, hollow; an uneven one adds the even harmonics too, from hollow towards nasal.
Try: a Sine with Wavefold moved slowly by an LFO or Env 1: it sounds almost like a resonant filter sweeping, but rounder and more metallic. Symmetry at about 30 % adds a reedy edge.
Sample
A Sample source
A recording, played at the pitch of the keys: one of the factory samples or your own (WAV, AIFF, FLAC and more, up to a minute, from your Samples folder). Mode plays it once, loops it (crossfaded, at an even level), or as grains: short pieces of it, as many and as spread as Grain, Density and Spray say. Position is where it starts; Length is the loop's length.
Playing a recording at pitch
Sample-based synthesis starts from a real sound: a choir, a cello, a piano, a bowl, a field recording. To play it at another pitch, the recording is simply played faster or slower: twice as fast is an octave up, half as fast an octave down. This is what the first samplers did, from the Fairlight and the Emulator to the tape-based Mellotron before them, and why a sample played far from its own pitch changes character: an octave up it gets shorter and smaller ("chipmunk"), an octave down longer and larger.
A sample has a root, the note at which it plays as recorded. Aetheriae reads it from a note in the file's name ("Choir_A3.wav"; middle C is C4), or finds it from the sound; a sound with no clear pitch is taken as middle C. Played far above its root, a recording is read from a copy made an octave lower in rate, so it does not alias. A stereo recording stays in stereo.
One-shot, Loop and Grains
Mode chooses how the source plays its recording:
One-shot: from Position to the end, once, then silence. For hits, plucks and anything with an ending: a drum, a struck bell, a spoken word.
Loop: from Position, round and round a loop as long as Length. The loop's end blends into its start (over a quarter of the loop, at most 0.1 s), and a sound that dies away is held at an even level, so it does not jump back up at every turn. For sustained sounds: a held note of strings, a choir's "ah", a drone.
Grains: granular synthesis. Instead of playing the recording through, the source plays many short, overlapping pieces of it, called grains, each faded in and out, read around Position. The recording stands still in time and breathes: a single moment of a voice becomes an endless pad. Grains cost more processing than a waveform.
In Grains mode three more controls shape the cloud:
Grain is how long each grain is, 10 to 500 ms. Short grains buzz and flutter; long ones blur into a smooth wash.
Density is how many grains start every second, 1 to 50. Few is sparse and stuttering; many overlap into a continuous sound.
Spray scatters where each grain reads (up to a fifth of the sample either way) and where it sits between left and right. At 0 every grain reads the same place, held still; more is a cloud that shimmers and widens.
Move Position slowly (by hand, with an LFO or with the mod wheel set to Position) to travel through the recording at your own speed: a slow sweep through a spoken phrase turns it into a moving vowel texture. Spread detunes samples too, so two sources on the same recording drift apart into a chorus.
Try: a choir or string sample in Grains, Grain about 150 ms, Density about 20, Spray about 30 %, a long Attack and Release on the amp, and Position moved by a slow smooth-random LFO: an evolving pad from a few seconds of sound.
FM
An FM source: its routing drawn, and its eight macros
Six sine operators per voice, modulating each other, played with eight macros: the carrier and modulator ratios, Index (how bright), Harmonics, Feedback, Detune, Mix and the modulators' envelope. On its Setup tab, Algorithm chooses how the six are wired (the display draws it), Ratios keeps the ratios harmonic, free or at fixed frequencies, and Velocity says how much playing harder brightens it. The appendix FM algorithms lists them.
How FM works
Frequency modulation synthesis was discovered by John Chowning at Stanford in the late sixties and made famous by Yamaha's DX7 in 1983, whose electric pianos, basses, bells and brass are all over the music of the eighties. Its idea is simple: let one sine wave, the modulator, wobble the pitch of another, the carrier, very fast, at an audio rate. A slow wobble would be vibrato; a fast one is heard as new tone, a set of new partials either side of the carrier, called sidebands.
Each sine is an operator. The carriers are what you hear; the modulators are not heard themselves, only in what they do to the carriers. Like the DX7, Aetheriae does this as phase modulation, which sounds the same and stays in tune: the modulator pushes the carrier's phase forward and back within every cycle, so the carrier is read faster for a moment, then slower, and its gentle sine bends into something with corners.
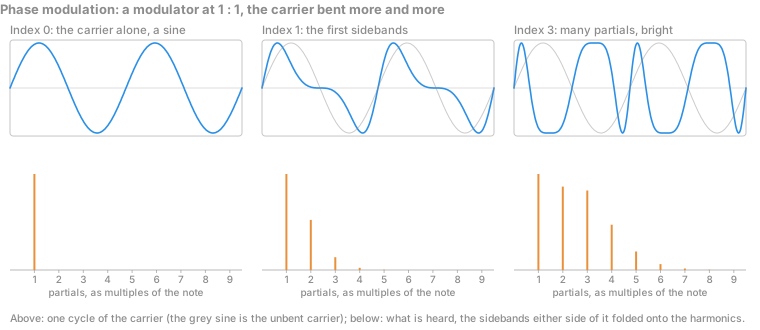
Phase modulation: the carrier bent more and more by a modulator at the same frequency, and the partials this puts into the sound
Two numbers decide the sound:
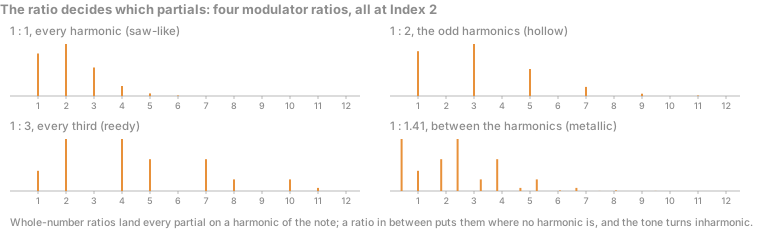
The ratio between the modulator's and the carrier's frequencies sets which partials appear. A modulator at r times the carrier puts sidebands at the carrier plus and minus r, plus and minus 2 r, 3 r and so on (the ones that would fall below zero fold back up, which is why the picture above has a partial at every harmonic). With whole-number ratios (1:1, 1:2, 1:3) the sidebands land on harmonics of the note, and the tone is harmonic: 1:1 gives every harmonic, a saw-like edge; 1:2 the odd ones, hollow like a square; 1:3 a reedy tone with every third. With ratios in between, the partials fall between the harmonics: metallic, bell-like, clangorous.
The index, the modulator's strength (how far it swings the carrier's phase), sets how many appear. At 0 the carrier is a pure sine; as the index rises more and more sidebands come in, and the sound gets brighter, then buzzy, then harsh. Because the index moves the brightness, an envelope on it does what an envelope on a filter does in subtractive synthesis: a quick decay of the index is the "ping" of an FM electric piano or bell.
The ratio decides which partials: four modulator ratios at the same index
The partials' levels are not simple (they follow Bessel functions, and a sideband can even vanish at a particular index and come back above it), which is why FM sounds "alive" as the index moves: not a filter sweeping, but partials rising and falling against each other. It is also why an FM sound is hard to predict from the numbers, and easier to find by ear.
Algorithms
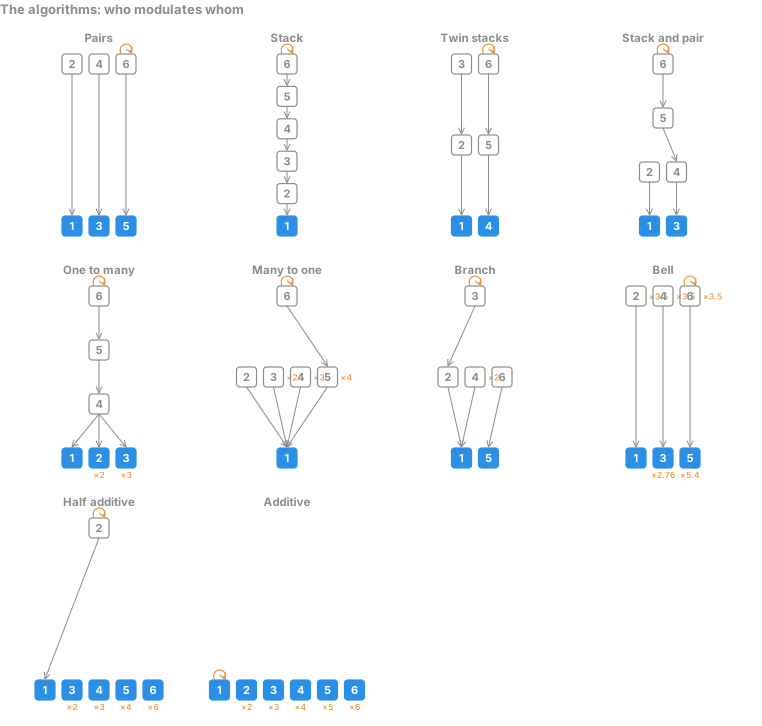
With six operators there are many ways to wire them: which modulate which, and which are heard. Each wiring is an algorithm, as on the DX7. The display draws the one chosen the way the figure below does: the carriers that are heard along the bottom (filled), each modulator above what it modulates, an arrow from a modulator to its target, a loop on the one operator that feeds back on itself (Feedback turns it), and a multiple (×2, ×3.5) beside an operator whose ratio is a multiple of the macro's. Click the display to choose another; each one's tooltip says what it is for.
The ten algorithms: who modulates whom
Pairs: three carriers (1, 3, 5), each with its own modulator (2, 4, 6): three simple FM voices side by side, all at the same ratio, so they add up to one tone. The classic DX7 electric piano, and the safest algorithm to start with: one modulator on one carrier is the whole of FM in its clearest form.
Stack: a chain of six, 6 modulating 5, 5 modulating 4, down to carrier 1. Each modulator is itself already a complex wave by the time it modulates the next, so the sidebands get sidebands: from a soft tone at a low Index to the harshest, most complex FM there is. Index is shared out down the chain (the operators far from the carrier get less), so the knob stays usable all the way up.
Twin stacks: two chains of three (3 → 2 → 1 and 6 → 5 → 4): two rich FM voices, which Mix balances. Detune them against each other for a wide, beating lead.
Stack and pair: a chain of four (6 → 5 → 4 → 3) beside a simple pair (2 → 1): a complex tone and a clean one in the same note, Mix between them. For basses and leads that need both body and bite.
One to many: one modulator chain (6 → 5 → 4) driving three carriers at once, and the carriers sit at the first three harmonics of the note (×1, ×2, ×3). All three brighten together as Index rises: an organ-like tone that opens as one.
Many to one: four modulators (2, 3, 4, 5) into one carrier, at ×1, ×2, ×3 and ×4 of the modulator ratio, one of them (5) modulated in turn by 6. Several modulators on one carrier give the densest sidebands: buzzy, brassy, a wall of partials.
Branch: carrier 1 is modulated by two operators (2 and 4), with 2 stacked under 3, beside a plain pair (6 → 5). The two modulators at different multiples give brass its two-sided edge; the feedback here is on operator 3, at the top of the branch.
Bell: three pairs, as Pairs, but the carriers are placed at a bar's partials (×1, ×2.76, ×5.4: the modes of a free bar, see the Resonator below) and their modulators well above, at ×3.5. The inharmonic carriers make the strike of a bell or a chime; the high modulators add its shimmer. Use Free ratios and let Harmonics pull the modulators about.
Half additive: one FM pair (2 → 1) under four plain sine carriers at harmonics ×2, ×3, ×4 and ×6: a drawbar organ with a little bite from the pair. Index brightens only the pair; Mix balances the pair against the sines.
Additive: six sine carriers at the first six harmonics and nothing modulated: a drawbar organ, Mix setting the fundamental against the others. Index does nothing here, but Feedback does: the first carrier modulating itself gives the organ an edge.
The eight macros
Programming six operators one by one, as on the DX7, is famously hard. Aetheriae plays them together with eight macros, in the spirit of Elektron's Digitone:
Carrier: the carriers' ratio to the note, 0.5 to 16 (×1 is the note, ×2 an octave up). Below ×1 the carriers sit under the note and the modulators' sidebands make the note's harmonics above them: sub-heavy tones.
Modulator: the modulators' ratio, the main choice of timbre: ×1 every harmonic, ×2 the odd ones, ×3 and up thinner, higher sets of partials.
Index: how strongly the modulators move the carriers, all together: the brightness. The knob is scaled so that its lower half is the musical range and the top is for noise and bite.
Harmonics: pulls the modulators away from their whole-number ratios, each its own way (one up a little, one down, one further): from clean, through bell-like, to clangorous. Even in Harmonic mode this adds the inharmonic colour on top of the snapped ratio.
Feedback: one operator modulating itself (the loop in the algorithm drawing): a sine modulated by itself turns into a saw, and with more feedback into noise. The classic way to put a saw-like edge or a breath of noise into an FM sound.
Detune: pulls the operators apart in pairs, one sharp and one flat, up to 15 cents: a slow beating, wider. With Twin stacks or Pairs this is a chorus inside the source.
Mix: with more than one carrier, the first against the others: in Pairs the first pair against the other two; in Stack and pair the chain against the pair; in Additive the fundamental against the upper harmonics.
Mod env: the modulators' envelope: low is a short pluck (bright for an instant, then the plain carriers), high a slow, evolving decay that holds part way. This is the index envelope that gives FM its pianos and bells; the carriers themselves follow the source's amp envelope, or their own (see Carriers below).
On the Setup tab, Ratios decides how the ratio macros move. Harmonic snaps them to 0.5, 1, 2 and so on up to 16: clean and in tune. Free lets them sit anywhere between: metallic and beating. Fixed makes them frequencies, 1 Hz to 10 kHz, the same whatever key is played: for drums, clangs and noises (and for a modulator at a few hertz: a tremolo or a growl inside the sound). Velocity says how far playing harder raises the index, brightening the note, as on an acoustic instrument. Carriers chooses the carriers' envelope: Amp (they stay at full level and the amp envelope shapes them) or Own (they decay in the Mod env's time down to silence, a pluck even under a held amp envelope). Above middle C the modulators are turned down a little with every octave, so high notes do not turn harsh, and in Fixed mode each key starts its operators at a phase of its own, so a chord does not add up in step.
Try:
An electric piano: Pairs, Harmonic, Carrier ×1, Modulator ×1, Index about 40 %, Mod env low, Velocity Medium. Raise Index and the tines get harder; a little Detune makes it a chorused Rhodes.
A bell: the Bell algorithm, Free, Modulator around ×3.5, Harmonics up a little, Mod env high and a long amp Release. Play it high and soft.
A deep bass: Stack, Harmonic, Carrier ×0.5, Modulator ×1, a low Index and a touch of Feedback; Mod env short, Velocity High, so each note has its own click.
Brass: Branch or Many to one, Modulator ×1, Index about half, Mod env long, and a slow amp Attack so the partials open through the note.
A drum or a clang: Fixed ratios, the Carrier a few hundred hertz, the Modulator well off it, Carriers at Own with a short Mod env.
Phase distortion
A phase distortion source: its wave drawn as it is bent
A cosine whose phase is bent within each cycle, as on the Casio CZ: Amount bends it from a pure sine to a saw, square, pulse or resonant shape, with a second shape to mix in, and Skew weighs its two halves. Its own envelope (DCW) moves the amount over each note.
How phase distortion works
Casio's CZ synthesizers, from the CZ-101 of 1984, made their sounds in a way of their own. A sine (strictly, a cosine) is read through its cycle at the note's pitch. Normally it is read evenly, at the same speed all the way round. Phase distortion reads it unevenly: it rushes through part of the cycle and lingers over the rest. The pitch stays the same (one cycle still takes as long), but the shape changes: rush through the first half and dawdle through the second, and the gentle sine turns into a sharp-edged saw.
The more the reading is bent, the more harmonics appear. So phase distortion does with one knob what an analogue synthesizer does with a bright wave and a filter: at Amount 0 % the source is a pure sine; turning Amount up opens it, harmonics coming in as a filter opening lets them through. Casio called this the DCW, the digitally controlled wave, and gave it its own envelope. Unlike a filter it has no resonance peak of its own and no slope: the harmonics come in in the proportions the shape dictates, which is the CZ's own character, clean and slightly glassy.
Two things set it apart from FM, which also starts from a sine: the harmonics it adds are always those of the note (never inharmonic, unless a Reso shape is tuned off), and its brightness goes up smoothly with Amount, without the rise and fall of FM's partials.
Shape and Shape 2
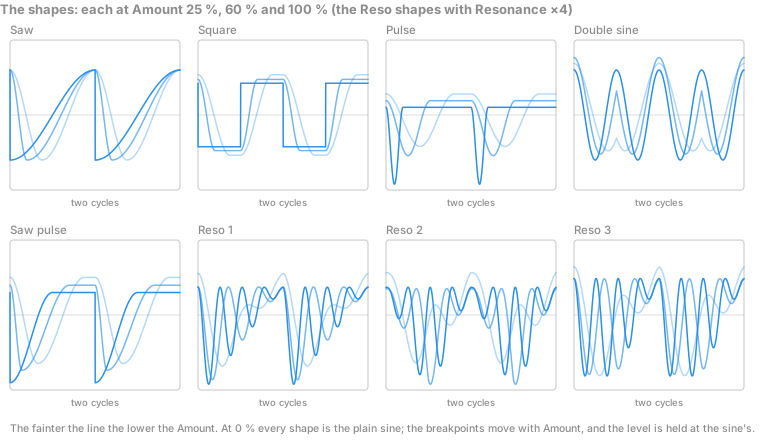
Shape says how the cycle is bent. The figure shows each at three Amounts (the fainter line the lower):
The eight shapes at three Amounts
Saw: the first half of the cosine (its top to its bottom) is squeezed into the start of the cycle, the second half stretched over the rest. At full Amount the fall is instant and the rise takes the whole cycle: a saw. Every harmonic, the all-round shape, the one to start with.
Square: both halves squeezed, each followed by a hold at its end (the bottom, then the top), so the wave stays flat between two fast edges: a square at full Amount. Odd harmonics only: hollow, woody, clarinet-like.
Pulse: the whole cosine squeezed into the start of the cycle and then a hold at the top, down to a fifth of the cycle: a narrow pulse, thin and nasal, the way a narrow pulse width sounds on an analogue synthesizer. The spike is kept at the sine's loudness, so it is a strong, bright shape.
Double sine: each half of the cycle reads more than half of the cosine, the second half mirroring the first, so an octave comes in and at full Amount the wave has two humps a cycle: the octave above, all of it. A soft brightness, the second harmonic, rather than a sharp edge: organ and flute tones.
Saw pulse: the saw squeezed into the first part of the cycle, then a hold at the top: a saw followed by a pause, between a saw and a pulse, brighter and thinner than the saw.
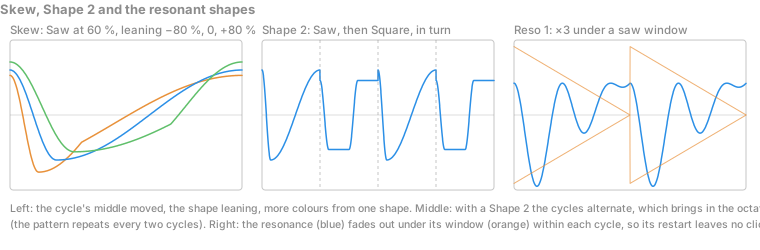
Reso 1, Reso 2, Reso 3: the CZ's famous resonant shapes. A second cosine at a higher frequency, Resonance times the note, is started again at the beginning of every cycle and faded out under a window: a saw (Reso 1: loud at the start of the cycle, fading to nothing by its end), a triangle (Reso 2: rising to the middle and falling again) or a trapezoid (Reso 3: held for the first half, fading over the second). Because the window is zero where the cycle restarts, the restart leaves no click. The result sounds like a resonant filter at Resonance times the note, swept by Amount, without a filter in the path: Amount takes the resonance from the note itself (×1, which is just the sine) up to Resonance.
Skew, Shape 2 and the resonant shapes
Shape 2 takes every other cycle, as the CZ's "wave 1 + wave 2" did: Shape plays one cycle, Shape 2 the next, and so on in turn. The pattern repeats every two cycles, so the octave below the note comes in (the way a sub-oscillator does), together with the mixed colours of the two shapes. Saw with Square gives a thick, woody tone; a plain shape with a Reso shape puts the resonance on every other cycle, the CZ's way of a resonant sound with a body under it. Off, Shape plays every cycle.
Skew moves the middle of the cycle off centre: the first half of the shape takes from 10 % to 90 % of the cycle, as far as Amount says (at Amount 0 it is still a sine). The shape leans one way or the other, which gives it the even harmonics it did not have (a leaning square is no longer hollow) and more colours from one shape; swept by an LFO, it is a pulse-width modulation that works on every shape.
Every setting is kept as loud as the sine and has no offset, so turning Amount or changing Shape does not jump in level. At the top of the keyboard the steepest parts of the shapes are kept to a few samples and the resonance below a quarter of the sample rate, so nothing aliases.
The DCW envelope
On the Envelope tab, each note runs its own envelope (Attack, Decay, Sustain; the release is the amp's) and Env amount says how far it moves Amount, up or, below zero, down. A short decay with a positive Env amount is a pluck or a bass that snaps open and closes; a slow attack is a sweep that opens through the note. Res env moves the Reso shapes' resonance with the same envelope, up to four octaves either way: the classic CZ "wah". Velocity scales the Amount by how hard you play: Low, Medium or High.
Try:
A CZ bass: Reso 2, Amount low, Env amount high, Decay about 0.3 s, Sustain low, Res env up. Each note opens and closes like a filter, without a filter.
A soft pad: Saw with Amount about 20 % and a slow Attack on the DCW envelope, so each note brightens as it swells; Shape 2 at Double sine for a little air an octave up.
A hollow lead: Square, Skew swept by an LFO (Modulation, LFO 1 to this source's Skew) at about 0.3 Hz and a good depth: pulse-width modulation on a square.
Glassy keys: Reso 1 with Resonance ×6, Amount about 40 %, Env amount up and a short Decay: the CZ-101's "resonant" piano.
Resonator
A Resonator source
A physical model rung by an exciter: an impulse, noise, a mallet, a pluck, a blow, particles or a bow, or another source's sound (Input). The resonator is a Modal bank of 32 partials (bells, bars, plates) or a String. Structure, Brightness, Damping and Strike shape what rings. On a string, BBD puts it through a bucket-brigade chip, and Invert turns its loop upside down so it rings at its odd harmonics, like a clarinet.
Physical modelling: an exciter and a resonator
The other Types make a waveform and play it. A resonator works the way acoustic instruments do: something sets an object vibrating, and the object's own shape decides what it rings at. A guitar string is plucked, a marimba bar struck, a violin bowed, a flute blown: two parts, the exciter and the resonator. Synthesizing the pair, rather than the sound they make, is called physical modelling. It gives sounds that react naturally: a harder strike is brighter, a held bow keeps a string singing, every note is slightly different. (The idea runs from the Karplus-Strong plucked string of the early eighties and Julius Smith's waveguides at Stanford to Yamaha's VL1 and the Mutable Instruments modules Elements and Rings.)
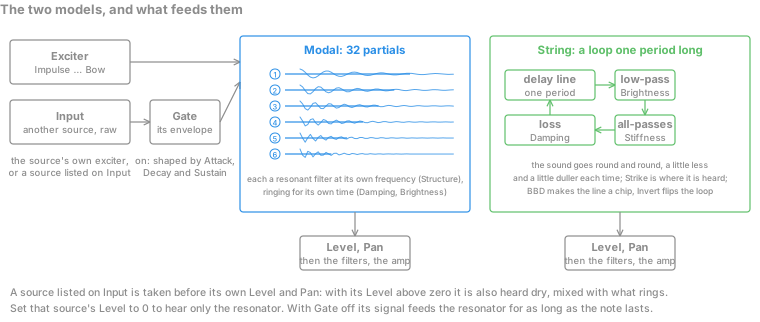
The two models, and what feeds them
The resonator's controls are on two pages, on upright tabs at the right of them (before Pitch, Pan and Level), as FM's (Macros, Setup) and phase distortion's (Shape, Envelope) are: Exciter and Resonator.
The exciter
Exciter chooses what sets it ringing:
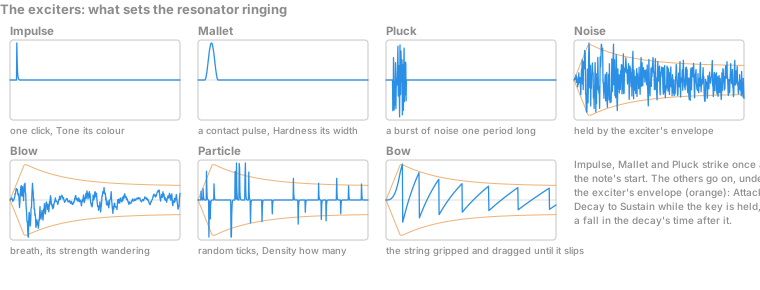
The exciters: what each puts in
Impulse: a single click, one sample's worth of energy: the cleanest way to hear the resonator itself, every partial struck equally.
Mallet: a contact pulse, a soft felt head that stays on the bar for 8 ms or a hard plastic one that leaves it in a third of a millisecond. A longer contact puts less of the high partials in, so a soft mallet is round and dark, a hard one bright and clicky, with the same momentum.
Pluck: a burst of noise one period of the note long, as a plucked string starts out: every partial, in a random mix that is slightly different every note, which is what makes plucks sound alive.
Noise: noise, held as long as the exciter's envelope says: a snare's wire, wind over a pipe, rain on a roof.
Blow: breath, its strength wandering a few times a second as a player's does: a flute's or a pipe's sustained tone.
Particle: tiny random ticks, sparse or dense, like rain or sand on a surface, or a shaker.
Bow: a bow drawn across the resonator, in a loop with it: the bow grips what it touches and drags it until it slips, as a violin bow does (the stick-slip curve of Smith's and Cook's bowed string), so the string or bar is driven at its own pitch and sings.
Impulse, Mallet and Pluck strike once, at the start of the note. Noise, Blow, Particle and Bow follow the exciter's own envelope (Attack, Decay, Sustain): with a Sustain above zero, the resonator keeps being bowed, blown or rattled while the key is held, and when the key is let go the exciter fades in the decay's time while what rings dies away at its own pace. This envelope starts with the note, before the resonator, whatever the amp envelope does.
The knob beside the exciter is its own control, and its name changes to say what it does: Tone (impulse and pluck, dark to bright), Hardness (mallet, soft felt to hard plastic), Colour (noise, dark to white), Breath (blow), Density (particles, a few ticks a second to hundreds) and Pressure (bow, from a light, airy touch that barely speaks to a heavy, gritty one).
Another source as the exciter
Input can feed the resonator with another source's sound instead of its own exciter: a saw, a sample, an FM source, an Air source. The menu lists the sources by number; the signal is taken raw, before that source's Level and Pan, so the resonator hears it at full strength whatever its knobs say.
That has a consequence worth knowing: the source you feed in is still a source of its own, and with its Level above zero it is also heard dry, mixed with what rings. If you want to hear only the resonator, turn that source's Level to 0: it then feeds the resonator and nothing else. (Its filters and amp envelope do not apply to what the resonator gets, only to its own dry sound; the resonator's own filters and amp envelope shape what rings.) Leave the Level up on purpose when you want both, a plucked string with its pick noise, say, or a sample with a ring under it.
Gate sits under Input and says how the input is let in. On, the exciter's envelope (Attack, Decay, Sustain) shapes it: the input is a strike or a swell at the start of every note, a short Decay striking the resonator with the first moment of the input and leaving it to ring, a slow Attack feeding it in gradually. Off, the input feeds the resonator for as long as the note lasts, the way the sympathetic strings of a sitar ring along with whatever is played: a sustained saw keeps a string resonator singing at its partials, a looped sample keeps a bell humming.
What goes in matters as much as the resonator: a bright, short input (a short Decay on Gate, or a source with a fast amp envelope) is a strike; a steady, noisy one (Air, or a Sample of a texture) is a bow or a breath; a pitched one tuned to the resonator (the same Pitch) reinforces its partials, and one tuned away from it (a fifth, an octave and a third) rings the partials nearest to its harmonics, a bell struck with a note.
The resonator
Model chooses what rings.
Modal is modal synthesis: a bank of 32 partials, each a resonant filter that rings at its own frequency when struck, and dies away in its own time. Any rigid object, a bar, a bell, a plate, a drum's skin, rings in a set of such modes, and their spacing is what makes a marimba sound like a marimba and a bell like a bell. Structure moves the partials between five shapes, blending from one to the next:
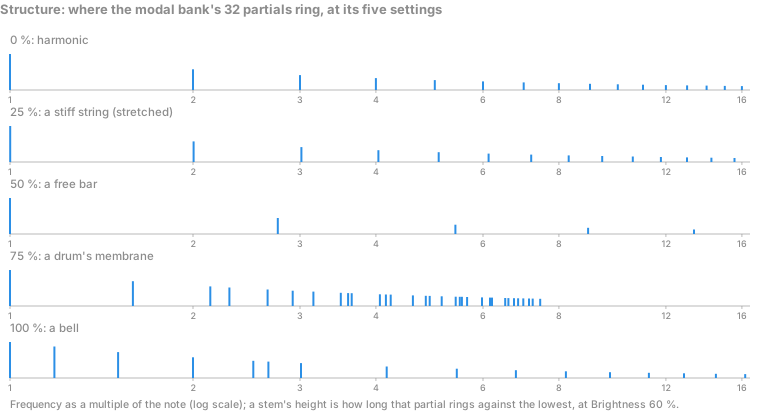
Structure: where the 32 partials ring, at its five settings
0 %, harmonic: the partials at 1, 2, 3, 4 … times the note, as on an ideal string: a plain, pitched tone, an organ pipe or a plucked string with no stiffness.
25 %, a stiff string: the harmonics stretched, each a little sharper than the last, as on a piano whose strings are stiff: the piano's slightly out-of-tune brightness. (The stretch is small: it is heard as a shimmer rather than a detuning.)
50 %, a free bar: the modes of a bar free at both ends, at 1, 2.76, 5.40, 8.93 … times the note: a marimba, a vibraphone, a glockenspiel. Widely spaced, so the tone is clear and bell-like with a definite pitch.
75 %, a membrane: the many, closely spaced modes of a drum's skin (1, 1.59, 2.14, 2.30, 2.65 …): a drum, a tabla, a tom. So many modes so close together that the pitch is vague and the tone is a thud or a boom.
100 %, a bell: a church bell's partials, with the hum note an octave below the strike note (0.5), then the prime at the note, the tierce at 1.18, the quint at 1.5, the nominal at 2 and the upper partials above: the bell's characteristic minor-third colour.
String is a waveguide: a delay line exactly one period of the note long, with the sound going round and round it, losing a little each time, as a wave travels up and down a real string. This is the Karplus-Strong idea: excite a short loop of delay with a burst of noise, and it rings as a plucked string, its top fading faster than its fundamental. Here Structure becomes Stiffness: all-pass filters in the loop delay the high partials a little more than the low ones, which pulls them sharp, as on a piano, most on high notes. A bowed string is modelled as two lines either side of the bow, so the bow's place (Strike) is where it is played.
For both models:
Brightness is how long the higher partials ring against the lowest: low is soft and wooden (the top dies at once, a dull gut string), high glassy and metallic (every partial rings nearly as long as the fundamental, a bright steel one).
Damping is how long it rings: about 20 seconds at 0 to 10 ms at 100 %. With a short amp Release the ring is cut off when the key is let go; with a long one it rings on. (With a continuous exciter, noise, a blow, a bow or an input with Gate off, a long ring would build up without end, so what goes in is evened out to what a tenth of a second's ring would hold.)
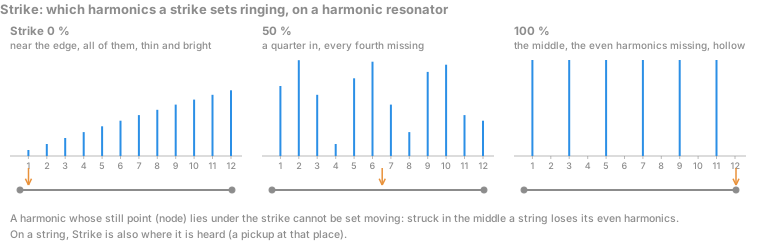
Strike is where it is struck (or, on a string, heard), from the edge to the middle. A partial whose still point (its node) lies there is not set ringing: struck in the middle a string loses its even harmonics and sounds hollow; struck near the end it is bright and thin, like a guitar played near the bridge.
Strike: which harmonics a strike sets ringing
BBD and Invert
Two switches change the String model's loop (the modal bank has no loop, so they do nothing there).
BBD makes the string's delay line a bucket-brigade chip, the analogue delay chip of string ensembles and echoes, clocked so that it is one period of the note long. Its filters sit in the loop, so the top fades a little more each time round, and the lower the note the slower the chip's clock and the darker the string. Loud strikes saturate as they come out, and there is a little hiss: a string that sounds as if it were built from the circuits of an old ensemble.
Invert turns the loop upside down, so the sound comes back inverted every time round, as in a pipe closed at one end. Only the odd harmonics ring, hollow and reedy, like a clarinet, and the note stays in tune. Not with the bow, whose grip and slip would pull an inverted loop out of tune.
Try:
A marimba: Mallet with Hardness about 40 %, Modal, Structure 50 %, Brightness about 40 %, Damping about 50 %, Strike a little off centre. Harder mallets for a xylophone; Structure 100 %, Brightness high, Damping low and a long amp Release for a bell.
A plucked string: Pluck and String, Tone about 60 %, Damping about 30 %, Strike about 20 %: near the bridge. Stiffness up a little for a piano-like wire; BBD on for the string of an old ensemble; Invert on for a clarinet-like reed.
A bowed string: Bow with a slow exciter Attack, full Sustain, Pressure about half, String; a little vibrato from the Modulation section brings it to life. On the Modal bank at Structure 50 %, the same bow sings a bar at its fundamental, a bowed vibraphone.
A sitar's drone: source 1 a Saw with its Level at 0; source 2 a Resonator, Input source 1, Gate off, String, Damping low. The saw never sounds itself; the string rings along with it for as long as the key is held.
A struck sample: source 1 a Sample (a drum hit, say) with its Level at 0; source 2 a Resonator, Input source 1, Gate on with a short Decay, Modal at Structure 100 %: the hit's first moment strikes a bell, which rings at the key's pitch. Turn source 1's Level back up to hear the hit with the bell under it.
Air
An Air source: the drawing of its noise, Noise, Colour and Track, then Pitch, Pan and Level
Noise, beside the other sources: for the breath of a choir, the bow noise of strings, the chiff of a flute, the hiss of an old string machine's circuits. An Air source is a source like any other: it has its Level and Pan, goes through its own filters and amp envelope, and swells and fades with every note, which is what makes it sound like part of the instrument rather than a hiss laid on top. Its Pitch does nothing, since noise has none. Each voice has its own noise generator, so the noise of a chord is as wide as the chord.
Noise chooses what it is made of:
White: plain hiss, everything above the Colour frequency.
Pink: softer on top, with more body, also above the Colour frequency.
Breath: a band of noise around the Colour frequency, like air blown through a pipe or between the lips.
Grain: noise held in small steps at a rate set by Colour: a digital rasp.
The display draws the noise as it is set: a dense scribble for White, rounder for Pink, a narrow band for Breath, stair steps for Grain, smoother or busier as Colour moves.
Colour says where the noise sits, from 300 Hz (a wide, low hiss) to 8 kHz (only the very top). Track makes the Colour follow the keys: at 0 % every note has the same noise; at 100 % an octave up the keyboard moves the colour an octave up, so the noise takes on a pitch of its own.
Try: beside two Saw sources, an Air source with Breath, Colour about 2 kHz, Track 50 % and a low Level, its amp Attack a little slower than theirs: the breath comes in as the note settles, as a choir's does. Or a Grain source alone, through a Vox filter with its vowel moved by LFO 1, for a whispered voice.
Filters
A source's lower half: Filter A on its Settings tab, the Filter routing switch, the Filter A and Filter B tabs and the upright page tabs
Every source has two filters of its own, Filter A and Filter B, on the tabs of the Filters part under its controls. They work on the source's own signal, before its amp envelope, level and pan, so each layer of a note can be filtered on its own: a dark pad under a bright pluck, a sample with its rumble cut, one layer singing a vowel while the rest stay plain. (The master filter, Filter A and Filter B in the All sources section, is another pair built the same way, on the sum of all of a voice's sources: see The master filter.)
Filter routing says how the two are joined. In Series the sound goes through Filter A and then through Filter B: a lowpass and then a highpass make a band of your own width, two lowpasses a steeper slope, a peak after a lowpass a resonance of its own. In Parallel it goes through both side by side and the two are added: a lowpass beside a highpass leaves the lows and the highs and takes the middle away, a filter beside an all-pass adds up and cancels where their phases differ. A filter that is off is left out either way, so one filter alone is simply one filter.
Filter routing comes first in the row, whatever the page; the open filter's switch comes first on its Settings page (off, the sound passes the filter untouched and it costs nothing). Each filter has four pages, on upright tabs at the right of the row: Settings, Env (its envelope), LFO 1 and LFO 2.
Settings
The filter's switch comes first, then its Type and its knobs. The Response display draws what the filter does, whatever its type.
LP 24 and LP 12: a lowpass, steep (24 dB an octave: dark, round, the classic synthesizer sound) or gentle (12 dB an octave: brighter and more open). What is below the cutoff passes.
BP: a band around the cutoff only: thin, nasal, telephone-like.
HP: a highpass, taking away what is below the cutoff: for thinning out a layer or removing rumble.
Notch: the opposite of a bandpass: it takes a band around the cutoff away and leaves the rest. Still, a single notch is subtle; swept by an LFO or the envelope, it is the hollow movement of a phaser, and two notches in series dig a deeper hole.
Peak: a bell that raises or lowers the band around the cutoff, as one band of a parametric equaliser. The Resonance knob becomes its Gain, up to 18 dB either way, with 0 dB in the middle, where it does nothing; the bell's width is fixed. For bringing out a formant, a nasal honk, or taking a harsh band down.
Low shelf and High shelf: raise or lower everything below, or above, the cutoff, as the bass and treble of a tone control. The knob is the Gain again. For warming or thinning a layer without the resonant character of a lowpass.
All-pass: a phase shifter, every frequency turned by the same angle, its one knob Phase (0 to 360 degrees); the level stays. Held still it is heard on attacks and beside the other filter in Parallel; turned round by an LFO (Saw up, Unipolar, full depth) it shifts every frequency of the sound by the LFO's rate, from a slow beating shimmer to a metallic clang.
Vox: a vowel filter, also called a formant filter. Three narrow resonances stand where the first three formants of a sung vowel are, the peaks in a voice's spectrum that the ear hears as A, E, I, O or U. The Cutoff knob becomes Vowel: across its range it moves through the five vowels, gliding from one to the next. The Resonance knob becomes Shift, which moves the formants up or down by up to an octave, a smaller or a larger voice, with the middle as sung. The Key track knob becomes Mix: how much of the vowel is heard, from none (the sound as it is) to the vowel alone, a hint of a voice in between. The envelope moves the vowel as it would a cutoff, and an LFO on the cutoff sways it between the vowels (at full depth half of A to U either way, turning back at the ends), so LFO 1 on the cutoff keeps the vowel moving. Put strings through it and they begin to sing: the old string machines' "choir" and "vox humana" sounds.
Cutoff is the frequency where the filter starts to take the sound away (or where a peak, a shelf or a notch sits), from 20 Hz to 20 kHz; a lowpass at the very top is out of the way altogether. Resonance emphasises the sound at the cutoff, from a soft bump to a sharp, whistling peak: it gives a sweep its vocal, wah-like quality. (For a peak or a shelf the knob is the gain, for Vox the shift; switching to one of those with the knob at its left end puts it in the middle, so nothing jumps. Double-click puts it back there.) Key track lets the cutoff follow the keys up from middle C and down below it: at 100 % every note keeps the same tone. Envelope says how far the filter's envelope moves the cutoff, up to eight octaves, upwards or (below zero) downwards: a quick decay with a fair amount is a pluck, bright at the strike and darkening at once; a slow attack opens the sound gradually as a pad swells.
Envelope
The filter's own ADSR (Attack, Decay, Sustain, Release), started by every note, drawn in its display. Right-click a slope in the drawing to choose its curve, Lin, Log or Exp (see Envelope curves); the drawing shows them.
LFO 1 and LFO 2
Each moves one of the filter's knobs slowly and steadily: its Destination lists the knobs the filter's Type has, by their names there: the cutoff (up to four octaves either way; for Vox the Vowel, for an all-pass the Phase, a whole turn at full depth), the resonance (or the Gain of a peak or shelf, the Shift of Vox), the key tracking (the Mix of Vox) or the envelope's amount. An all-pass has its Phase only. Both may go to the same place, and add up. Shape (drawn above its menu), Rate and Depth say how; Reset starts the LFO again with every note, Single shot runs it once and holds, an envelope of its own; Polarity says whether it moves both ways round the setting (Bipolar) or one way from it (Unipolar). The LFOs run once for all the voices, so every note moves together. To move anything else, use an LFO in the Modulation section.
Try: on a Saw, Filter A LP 24 with Cutoff about 1 kHz, Envelope 60 % and a short Decay on its Env tab, Filter B HP at 150 Hz in Series: a pluck with its mud cut. Or Filter A Vox with Vowel moved by LFO 1 (Rate 0.3 Hz, Depth 40 %), Filter B off: a slow "ah-oh-oo".
The amp envelope
A source's Amp part, at the top right of its tab: Attack, Decay, Sustain, Release and the shape drawn
The Amp tab is the source's own amplitude envelope, which shapes its level from the moment the key goes down until the sound has faded after it comes up: Attack (how long it takes to swell in, up to 20 seconds), Decay (how long it takes to fall to the sustain level), Sustain (the level held while the key is down) and Release (how long it fades after the key comes up, up to 30 seconds). A long attack and release make a pad; zero attack, a short decay and no sustain make a pluck or a hit.
Every source has one, so the layers of a note need not move together: a pluck that opens into a pad, a breath of air that comes in late, a sub that stops while the top rings on. A note is over once the longest of its sources' releases has died away; then its voice is free again.
Right-click a slope in the drawing to choose its curve, Lin, Log or Exp (see Envelope curves).
The master filter
All sources: Tune, Spread and the master filter, in the corner of the Sources section
The master filter, in the All sources section (in the corner of the Sources section, beside Tune and Spread), filters each voice as a whole: the sum of its sources, after each has passed its own filters and amplifier envelope (those are in Sources). It is two filters, Filter A and Filter B, on tabs, built exactly as a source's pair is; Filter routing joins them in Series (through Filter A, then Filter B) or in Parallel (through both side by side, the two added). A filter that is off is left out either way, and with both off the master filter is out of the path altogether. (A source's own two are called Filter A and Filter B as well; the master's are in the All sources section.)
A filter's tabs
Filter routing comes first in the row, whatever the page; the open filter's switch comes first on its Settings page. Each filter has four tabs of its own, upright at the right end of its row:
Settings: its Type: a 24 or 12 dB lowpass, a bandpass, a highpass, a notch, a peak, a low or high shelf, an all-pass or Vox, the vowel (or formant) filter (LP 24, LP 12, BP, HP, Notch, Peak, Low shelf, High shelf, All-pass, Vox). Cutoff and Resonance shape it (for a peak or a shelf the Resonance knob is its Gain, up to 18 dB either way; for Vox the Cutoff knob is the Vowel, A to U, and the Resonance knob the formant Shift; for an all-pass the Cutoff knob is its Phase, 0 to 360 degrees, and the others are hidden); Key track opens it for higher notes; Envelope says how far its envelope moves the cutoff, up or down. The Response display draws its curve, whatever the type. What each type does to the sound is in How Aetheriae makes its sound.
Env: the filter's own ADSR, drawn; right-click a slope in the drawing to choose its curve (Lin, Log or Exp).
LFO 1 and LFO 2: each moves one of the filter's knobs (those its Type has, by their names there: the cutoff or the vowel or the phase, the resonance or the gain or the shift, the key tracking or the mix, the envelope's amount), with its own shape, rate and depth.
Reset starts an LFO again with every note, Single shot runs it once and stops, and Bipolar or Unipolar says whether it moves both ways or one. Both LFOs may go to the same place; they add up.
Master or source?
A source's filters shape one layer; the master filter shapes the note. Put a vowel on the strings alone with a source's Vox filter and the air stays plain; put it on the master filter and everything sings. A lowpass sweep over the sum closes every layer together, as on a classic polysynth, while a sweep on one source leaves the others open. Both run in every voice, so each note is filtered on its own either way.
Effects
All the voices together, each already filtered and shaped on its own, pass through the effects in this order: the lo-fi effects placed Pre, ensemble or chorus, phaser, the lo-fi effects placed Post, the slicer (see Playing), delay, reverb, the lo-fi effects placed Out, and the volume. The drawing of the whole path, and what each stage does to the sound, are in How Aetheriae makes its sound.
Ensemble, phaser, lo-fi, delay and reverb on the panel
Ensemble and chorus
Ensemble is three modulated delay lines, the string-machine sound; Chorus is two lines and one LFO, a calmer movement. BBD makes the lines bucket-brigade chips, as in the originals: darker, a little saturated, a faint hiss.
Phaser
Four or eight stages, swept by its LFO, with feedback for a stronger sound.
Lo-fi
Lo-fi, on its Drift tab
Wear and tear, each effect on its own tab with its own switch:
Drift: each voice wanders slightly out of tune on its own, slowly, like the oscillators of an old analogue synth; a chord detunes against itself.
Wow: the pitch of the whole sound wavers slowly together, as a tape or a record whose speed is not quite steady.
Flutter: the same, quickly: a tremble.
Crush: fewer bits and a lower sample rate.
Tape: a cassette or VHS deck's saturation, hiss and dropouts.
Vinyl: crackle, noise and wear.
Wow, flutter, crush, tape and vinyl each have a Place: Pre (before the ensemble), Post (after the phaser, the default) or Out (at the very end, after the reverb).
Delay
Stereo or ping-pong echoes, a note value at the song's tempo (Sync) or a time in milliseconds, with Low cut and High cut on the repeats. BBD makes it a bucket-brigade echo: the longer the time, the darker the repeats.
Reverb
Hall (a dense, smooth space), Shimmer (a hall whose tail is pitched up as it goes round: an octave, a fifth, two octaves or an octave down) or Spring (three springs, as in an old amplifier). Freeze holds the tail for as long as it is on.
Playing
Chord, arpeggiator and slicer
Chord
Every key plays a whole chord: an inversion, the plain triad, a sus2 or sus4, an altered fifth (augmented in major, diminished in minor) or a seventh. Type makes them major or minor, and Bass adds the root an octave below.
Arpeggiator
Plays the held keys one after another: up, down, up and down, down and up, at random, as played, or all together as chords, at a rate in time with the song, over one or more octaves. Gate is how long each note sounds, Swing pushes every other step. With Hold on (on the keyboard, over the octave buttons) it keeps playing after you let go.
With Chord mode on as well, each key gives the arpeggiator its whole chord, as if you had pressed all of its notes: one key with a major triad is arpeggiated as the root, the third and the fifth, one note at a time (with Up, Down and the rest), or all three at once in the arpeggiator's own Chord mode. Two keys whose chords share a note play it once. Change the chord while it runs and the pattern follows.
Slicer
Cuts the sound in time with the song by a pattern of up to sixteen steps, each its own level: drag the bars, or start from a pattern in its menu. Depth is how far it cuts, Rate the length of a step. Place puts it before or after the delay and the reverb.
Tempo, wheels and Hold
Tempo and the mod wheel's setting, the wheels, Hold over the octave buttons, the keyboard, and the output
The pitch wheel bends two semitones either way and springs back. The mod wheel moves what Mod wheel is set to: vibrato, the cutoff, a source's position, the vowel, an FM macro or the phase distortion's amount or resonance. In a DAW the song sets the tempo; on its own, Tempo does.
Hold (Shift+H), the small key over the octave buttons, keeps the notes after you let go of the keys, until you play a new one with none held down: a latch, for a drone or a pad you want to leave sounding while your hands are elsewhere. It works on its own, with the keys, and with chord mode (the whole chord is held); with the arpeggiator on, it keeps the arpeggiator playing. Turn it off and what it held is let go.
MIDI
Aetheriae plays from any MIDI keyboard: velocity, aftertouch, the wheels and the sustain pedal. What the arpeggiator and the chord mode play goes out as MIDI too, to record or to play another instrument.
In a DAW it plays what its track sends it, on whatever channel: the track's MIDI input chooses the keyboard and the channel. The standalone app and the browser version have a MIDI channel of their own (Settings, Playing): All plays from every channel, a number only from that one, so that one keyboard split into channels can play Aetheriae and another instrument at once. The keyboard and the wheels on the page play on the chosen channel too; changing it lets go of the notes sounding.
Modulation
Modulation is what makes a sound move by itself: a pad that breathes, a filter that opens as a note is held, a vowel that wanders, a tremor that comes in when you push the mod wheel. Some of it is built in: every filter has its own envelope and its LFO 1 and 2, and every source its amp envelope. Beyond that, the Modulation section moves anything you choose, and its macros let one knob turn many:
Modulation
The Modulation section's tabs are Pitch, LFO 1 to LFO 4, Env 1 and Env 2, Matrix and Macro. Each LFO, each envelope and each matrix row is a slot that sends its movement to one destination, a knob of your choice.
Pitch
Glide slides from one note to the next (its Time is how long the slide takes), Vibrato wobbles the pitch (Rate and Depth), and Sweep bends each note into place from above or below at its start, as a drum's pitch drops. The mod wheel adds vibrato by default (its menu, Mod wheel, in the Tempo / Wheel section beside the keyboard, can also send it to the filters' cutoff, the sources' position, a Vox filter's vowel, an FM macro or the phase distortion's amount or resonance).
LFO 1 to 4 and Env 1 and 2
The Modulation section on LFO 1's tab
An LFO (low-frequency oscillator) is a slow, repeating movement; an envelope is a movement that starts with every note and runs its course: rising, falling to a level held while the key is down, and falling away when it comes up.
To make an LFO move a knob
Open the LFO 1 tab.
Choose its destination from the Destination menu at the start of the tab. It lists every knob that can be moved, grouped by section (the sources, one by one, each with its filters, then the master filter, the effects); or press Learn and then turn the knob it should move: the first knob you touch becomes the destination.
Turn Depth up: nothing moves at 0 %, and at 100 % the LFO swings the knob across all of its travel, either way of where it is set. The knob shows the movement while it happens: a thin arc beside its ring runs from where it is set to where the LFO has taken it.
Set the Rate (0.02 to 20 times a second) and the Shape, drawn above its menu: sine, triangle, saw up, saw down, square, random (a new value each cycle, held) or smooth random (a new value each cycle, glided to).
Reset starts the LFO again at the beginning of its cycle with every note, so each note moves the same way; off, it runs freely and every note catches it somewhere else. Single shot runs it once for each note and stops, like a short envelope. Polarity says whether it swings both ways of the knob's setting (Bipolar) or only up from it (Unipolar). The four LFOs run once for all the voices, so a chord moves together.
Try: LFO 1 to the master filter's Filter A cutoff, Triangle, Rate 0.15 Hz, Depth 30 %: a pad that slowly opens and closes. Or LFO 2 to a source's Pan, Sine, 0.3 Hz, Depth 60 %: a layer that circles between the speakers.
To make an envelope move a knob
Open the Env 1 tab and choose its Destination (or Learn) as for an LFO.
Set its Attack, Decay, Sustain and Release; the drawing shows the shape.
Turn Amount up (towards +100 %) to move the knob up from its setting, or down (towards −100 %) to move it down.
Env 1 and 2 start again with every note and run in every voice on their own, so each note of a chord has its own. Their slopes have curves of their own too (see Envelope curves).
Try: Env 1 to a source's Position (a wavetable), Attack 2 s, Sustain 100 %, Amount 70 %: every note travels through the table as it swells. Or Env 2 to a source's Pitch, Attack 0, Decay 0.08 s, Sustain 0, Amount 30 %: a pitch blip at every strike, the click of a mallet.
The matrix
The matrix: eight rows of a source, an amount and a destination
The matrix has eight more routes, one a row. Each takes a source (where the movement comes from), an amount from −100 % to 100 %, and a destination:
Velocity: how hard the key was struck.
Aftertouch: how hard it is pressed while held (on a keyboard that sends it).
Key: which key it is, from low to high (middle C in the middle).
Mod wheel: where the wheel is.
LFO 1 to 4 and Env 1 and 2: the LFOs and the envelopes at full depth, whatever their own Depth or Amount, and wherever their own destinations are: a second route for the same movement.
To set a row: choose its source from the first menu and its destination from the last, and drag its amount bar left or right.
Try: Velocity to the master filter's Filter A cutoff at 40 %: soft notes dark, hard notes bright, as an acoustic instrument does. Aftertouch to Vibrato depth: press into a held note for a singer's vibrato. Key to a source's Level at −30 %: a layer that thins out as you play higher. LFO 3 at full depth to two things at once: its own destination on its tab, and a second one in a matrix row.
Macros
The Macro tab: eight knobs, each with its name
A macro is one knob that turns several controls at once, each as far and in the direction you choose: one knob to open the filter, add drive and widen the chorus together; one to turn a clean pad into a worn one. The Macro tab has eight.
To link a control to a macro
Right-click the control (any knob, slider, switch or menu; on a touch screen, press and hold it).
Choose a macro under Assign modulation from macro. The menu now shows the link with its amount.
Drag the amount left or right (Shift for finer steps): at 100 % the macro's top moves the control across its whole range from where it is set, at −100 % the other way, at 30 % a third of the way. A switch or a menu moves in its steps.
Turn the macro on the Macro tab: the control moves with it, and shows where it is taken.
A small dot by a control's name says a macro moves it. Right-click the control again to change the amount, or click the macro (or ×) to unlink it.
To name a macro
Double-click the name under its knob, type ("Filter Drive", "Worn"), and press Enter. Escape keeps the old name; an empty name is the macro's number again.
Each macro can move up to 16 controls. An LFO, an envelope or a matrix row can turn a macro too, which then turns everything it is linked to. The macros are host parameters, so a DAW can automate them like any other knob (it shows them as Macro 1 to 8, whatever their names). Their names and links are saved with the sound: in presets, in the project and in Undo.
Try, a "Worn" macro: link Tape's Drive at 60 %, Wow's Depth at 40 %, Crush's Mix at 50 % and the master filter's Filter A cutoff at −30 % (with the tape and wow switched on), name it Worn, and turn it: the sound ages as you go. Or a "Bloom" macro: each source's amp Attack at 50 %, the reverb's Mix at 40 % and the ensemble's Mix at 30 %: from a pluck to a pad on one knob.
Seeing the modulation
While an LFO, an envelope, a matrix row or a macro moves a control, the control shows where it is moved to at that moment: a thin arc beside a knob's ring runs from where the knob is set to where the modulation has taken it, with a dot at its end. A switch or a menu that is moved off its setting has an outline. A control moved in each voice on its own (see below) shows the newest note's movement, and only while a note sounds. Turn it off in Settings, Appearance, Modulation on the controls.
Envelope curves
An envelope's curve menu: the attack shaded in the drawing, Lin, Log and Exp
Every envelope with a drawing has a curve for each of its three slopes: each source's amp envelope, its two filters' envelopes, the master filter's two, and Env 1 and 2. The curve is how a slope gets from where it starts to where it ends: evenly, fast at first, or fast at the end.
To set a curve
Move the pointer over the envelope's drawing. The slope under it is shaded: the attack from the start to the top, the decay from the top down to the sustain level, the release from where the key comes up to the end.
Right-click the slope (on a touch screen, press and hold it). A small menu opens with the slope's name (Attack curve, Decay curve or Release curve) and its three curves, the current one ticked; the slope stays shaded while it is open.
Choose Lin, Log or Exp. The drawing shows the slope's new shape at once, and the sound follows from the next note.
What each one does:
Attack: Log rises fast and then eases into the top, as an analogue envelope charges (the default); Lin rises evenly; Exp starts slowly and then faster and faster, blooming late.
Decay and Release: Exp falls fast and then levels out, as an analogue envelope discharges (the default); Lin falls evenly; Log falls slowly at first and then fast.
A logarithmic attack and an exponential release are what the ear takes for natural; a linear release is heard as fading too fast at the end, an exponential attack as a swell that arrives all at once.
Try: a pad's amp attack at Exp with Attack 3 s: it seems to wait, then blooms. A pluck's filter decay at Lin: the brightness drains away evenly, a woodier tone than the snap of Exp. A release at Log on a long pad: the note holds on after the key is up and then falls away, as a held organ chord let go in a church.
The curves are saved with the sound, and like every other setting they are host parameters a DAW can automate.
Each voice, or all at once
The master filters' cutoff, resonance, key tracking and envelope amount, each source's position, level, pitch and pan, and the same four settings of each source's two filters (the menus list them as "Source 1 · Filter A cutoff" and so on), are moved in each voice by that voice's own envelopes, velocity and key: every note on its own. Any other knob is moved for all voices at once, by the newest note.
Presets
Saving
Save writes over the loaded preset if it is one of yours; a factory preset is kept as it is and saved under a new name. Save as asks for a name, a pack, an author (Settings, Presets fills it in), a category and a description.
To delete one of your presets, right-click its name in the preset bar and choose Delete; the sound stays as it is. The factory presets are built in and cannot be deleted.
Packs and grouping
Presets can be gathered in packs: a pack is a folder in your presets folder. The preset menu groups them by category, by author, by pack (then category) or by pack (then author): choose in its heading or in Settings, Presets.
Files: Load and Save to a file
Save to a file…, in the Save as dialog, writes the sound as a preset file (.aetheriae) under the name you typed, or a whole pack of yours as one file (.aetheriaepack), to keep, to back up or to share. Load opens either, keeps what it holds with your presets and loads it (a pack's presets go in a pack of that name). A preset with a factory preset's name is kept as "Name (imported)". Files are also how presets travel between the plugin and the browser version, which keeps its own.
Shortcuts
Shift+S saves, Shift+A saves as, Shift+E saves to a file, Shift+O loads a file and Shift+I loads Init.
Settings and looks
Settings is on four tabs: Appearance, Playing, Presets and General.
Settings, on its Appearance tab
Themes
3D themes show the hardware: knurled, machined or chicken-head knobs, keys that go down, displays as screens, LEDs and lamps. Flat themes are plain, for a clear overview. Shift+V steps to the next theme.
Dark, the 3D one: the instrument's own look, and this manual'sLight 3D: aluminium knobs on light panelsVintage: warm cream and teak, as the string machines of the seventiesSilver Rack: brushed aluminium, rubber keys and an amber VU windowRed Machine: red anodised metal and a green LCDInstitute: hammertone enamel, chicken-head knobs, lamps and green CRTsThe flat Dark themeThe flat Light theme
Side panels
Wooden (walnut, rosewood, teak, oak, maple, ebony) or brushed metal cheeks either side, the one that matches the theme, or none (the default).
Zoom
The − and + buttons in the top bar, or Settings, set the window's size, from 50 % to 200 %. A plugin window can also be dragged by its corner.
Accent and displays
Rendering is how much of the look is drawn. Full is all of it: the textures, glows and filters, the knobs turning, the displays at 30 frames a second. Light leaves the textures, glows, filters and the CRT's afterglow out, draws one picture a knob, feeds the displays at 15 frames a second and, in the browser, plays eight voices instead of sixteen: for a phone, a tablet or an old computer, which share their few cores between the page and the sound. Automatic, the default, is Light on a phone or tablet and Full elsewhere.
Three colours can be given to any theme, 3D or flat: Accent colour, for what is drawn and highlighted (the displays' traces, a flat theme's knob rings and switched-on keys, the open tab's line), Lamp colour, for what glows when it is on (the LEDs, a key's lit legend, a tab whose contents are switched on), and Display lines, for the lines drawn in the displays alone (the wave, the filter's response, the envelopes, the LFOs' shapes, the resonator's, phase distortion's and FM routing's drawings, the slicer's steps and the scope), over the Accent colour's there, and on an LCD or amber screen in its deep shade like the screen's own segments. Each is Theme (the theme's own colours) or one of eleven colours; on a dark panel a colour is used in a brighter shade, on a light one in a deeper shade, so the words on keys and tabs always read. A display that glows (a VFD's, a CRT's) draws in the Accent colour too; an LCD keeps its own. The scope shows the waveform, the spectrum, a waterfall or a 3D waveform (the waterfall: the spectrum over the last three seconds, the newest in front, the older ones further back and fading: a filter sweep is a ridge travelling across, a shimmer reverb a slope climbing the octaves; the 3D waveform: the waveform over the last three seconds the same way, so a wavetable moving or a filter closing is seen changing the shape from ridge to ridge), with the stereo image beside it; a click on the scope steps through the four. The level meter shows peak and RMS.
The browser version
The browser version is the same instrument in a web page, at morphor.io/plugins/aetheriae/web: the same engine, presets and effects (how it differs from the plugin and the app is in Plugin, app and browser). A browser only lets sound start from a click or a key press, so click the page or press a key first.
On a phone or a tablet
The browser version plays on a touch screen: tap the keys (several fingers play a chord), drag a knob up or down, press and hold a control for the menu a right-click opens (a macro, a source tab, an envelope's curve), and double-tap a knob to put it back at its default. The tooltips stay away while you use your fingers.
MIDI in the browser
Chrome, Edge, Brave, Opera and Firefox let the page use your MIDI keyboards: the browser asks you first. Safari does not offer MIDI to web pages; play the keyboard on the screen or your computer keyboard there. Settings, Playing, MIDI channel chooses which channel it plays from: All, or one of the sixteen.
Your sounds in the browser
The browser keeps your presets, settings, wavetables and samples in its own storage, apart from the plugin's: save a pack to a file (Save as, Save to a file…) and load it on the other side to move your presets between them. Clearing the browser's site data clears them too.
Audio buffer
Settings, Playing, Audio buffer says how much sound the browser keeps ready: the smallest it has, or 10, 20, 40, 80 or 170 ms. A larger buffer keeps the sound from crackling on a busy or older computer; a smaller one plays a key sooner. The buffer the browser gave is shown beside it.
Troubleshooting
Crackles in the browser
Crackles that come when something else happens on the computer (a theme changed, a window scrolled, other apps busy) are the audio arriving late: choose a larger Audio buffer (Settings, Playing), 40 ms first, 80 or 170 ms on an older computer. In a DAW the buffer is the DAW's own audio setting.
Crackles or distortion on loud notes
If the level meter reaches the top when you hear it, the sound is clipping: lower the Volume, or fewer sources, resonance or drive.
No sound
In the browser, click the page or press a key to start the audio. Check that the Volume is up and the sources' levels are not at zero, and that Init (Shift+I) sounds: if it does, the preset's sound is quiet or switched off somewhere.
A preset sounds different in a DAW
The tempo comes from the song in a DAW: the arpeggiator, the slicer and synced delays follow it.
Under the hood
Two of Aetheriae's effects imitate old hardware: the bucket-brigade chips in the ensembles of the seventies' string machines (the Solina String Ensemble's, Roland's RS-202), in the choruses and in the analogue echoes, and the cassette and VHS tape. This chapter tells how they are modelled: what each part of the real thing did to the sound, and how Aetheriae does the same. You do not need any of it to use them; it is here for the curious, and to explain why they sound as they do.
How the bucket-brigade chips are simulated
The real chip
A bucket-brigade device (BBD) is an analogue delay line on a chip: a chain of hundreds or thousands of tiny capacitors, the stages. A clock moves the voltage held in each one on to the next, like buckets of water passed hand to hand along a line, so what goes in at one end comes out at the other a little later. The delay is the number of stages divided by twice the clock rate. A chip of 512 stages at 100 kHz delays by 2.56 ms; at 10 kHz, by 25.6 ms.
Because the signal is passed along in steps, the chip is a sampled system, as a digital one is: anything above half the clock rate would come out as aliasing, so the circuits around it filter the sound well below that. That is where its character comes from:
The longer the delay, the darker the sound. A longer delay means a slower clock, and the filters have to come down with it. A short chorus delay stays bright; a long echo is dull and warm.
It saturates early. The chip runs out of headroom well before a modern circuit would, and loud signals round off softly.
It hisses a little. Every stage adds a trace of noise, filtered with the rest.
The chips came in sizes: 256 stages (the MN3009 and its kin, in choruses), 512 (the MN3004, in the string ensembles), 1024 (MN3007), 2048 (MN3008) and 4096 (the MN3005, in the long analogue echoes). An echo's designer picked the chip that reached the wanted time, since more stages for the same time means a faster clock, so a brighter and cleaner sound.
In Aetheriae
Aetheriae keeps the delay line itself clean and lays the chip's three effects over it, so the chip can be switched in and out without a click and the time can glide smoothly:
The chip's size. The ensemble uses 512 stages, the chorus 256. The delay picks the chip an echo of its time would have used: the one with the most stages that still reaches the time at the fastest clock, 100 kHz (256 stages from 1.3 ms, 512 from 2.6 ms, 1024 from 5.1 ms, 2048 from 10.2 ms, 4096 from 20.5 ms and beyond).
The filters. From the size and the delay time, Aetheriae works out the clock as the chip would run it, and puts two gentle filter poles at a third of it on what comes out (never below 800 Hz, nor above 9 kHz, where the real circuits' filters stop following it up). As the delay time moves, the filters move with it: a delay swept by an LFO, as in the ensemble, brightens and darkens a little with its sweep, as the original does.
The saturation. What goes into the line is rounded off by a soft curve that leaves quiet signals exactly as they are (so in an echo with feedback the repeats are not pushed closer to running away), and folds the loud peaks over gently.
The hiss. A faint noise, filtered as the sound is, is added to what you hear, but never to what is fed back into the line: in a feedback loop it would build up into a ringing tone, which a real echo's circuits are designed to avoid.
The resonator's BBD switch (the String model) puts the same chip into the string's own loop: a 512-stage line in place of a clean one. There, the filters go into the loop, so every round the string makes darkens it a little more, as a string's own losses do, with a gentle highpass six octaves below the note so the loop does not gather a rumble; the tuning takes the filters' own delay into account, so the note stays in tune. The saturation and the hiss are on what you hear only: inside the loop they would damp the string on every round.
How the tape is simulated
The Tape effect (on the lo-fi section's Tape deck tab) is a cassette deck or a VHS recorder, and the Wow and Flutter tabs are what a tape transport does to the pitch. Each part is modelled on its own.
Wow and flutter: the speed of the tape
A tape passes the heads at a speed that is never quite steady. A slow waver, a few times a minute to a couple of times a second, is wow: a stretched or warped tape, a capstan slightly out of round, a sagging belt. A fast one, four to fourteen times a second, is flutter: the tremble of the mechanism itself.
Aetheriae plays the sound through a short delay line whose length moves: as the length grows the sound is played back slower and lower, as it shrinks faster and higher, which is exactly what a varying tape speed does. The swing of the length is worked out from the depth you set, in cents, and the rate, so the pitch moves by just that much at any rate. Wow follows a sine, or (its Shape at Random) a smooth random wander, as a worn tape does; flutter follows a quicker sine. Each has its own line, so they can sit in different places in the chain.
The deck: saturation, the top and the hiss
Magnetic tape saturates softly as it is driven harder: it evens out the level, rounds off the peaks and dulls the top. Drive turns all of that up together:
Saturation. The sound is driven up to eight times into a soft curve and brought back down, with quiet sounds raised more than loud ones, so the level evens out as on a tape pushed hard (a soft compression, as tape gives).
The top. A gentle filter rolls the highs off, from out of hearing at a light drive to about 7 kHz at full drive, as a saturated tape loses its top first.
Hiss. Tape hiss is a broad, soft noise, a little thin at the bottom: white noise with its lowest part taken down. It comes and goes with the sound (as on a deck whose noise reduction closes in the silences) or, with the hiss mode at Always, runs all the time, as on a tape left running. Each side has its own noise, so the hiss is wide.
Cassette and VHS
A Cassette is the deck as above. A VHS recorder's audio track (the linear track along the tape's edge, not the hi-fi one) is narrower still. Aetheriae gives it its own character: its top lower, at about 9 kHz and coming down to about 5 kHz as it is driven, with a second, steeper filter; the heads' bass bump, a lift of about 2.5 dB around 80 Hz that the playback head adds to the lows; and a darker hiss. Switching between the two glides from one to the other rather than jumping.
Dropouts
Where the oxide has worn off, or the tape lifts from the head for a moment, the sound drops out: its level dips and its top goes dull, for a fraction of a second. Dropouts sets how often (up to about two a second) and how deep (up to about 20 dB): each one starts by chance, lasts between 30 and 250 milliseconds, and the level glides down into it and back out, as a real dropout does, without a click. On VHS a dropout comes with a short burst of noise, the tracking error of a worn video tape.
Where it sits
Like every lo-fi effect, the tape can be placed Pre (before the ensemble and phaser: as if the instrument itself had been recorded to tape and then played through the effects), Post (after the phaser, the default: the instrument with its effects goes onto the tape) or Out (at the very end: the whole mix, echoes and reverb included, played from a cassette). At Cassette with no dropouts, and with the tape switched off, the sound passes exactly as it was.
Glossary
Air
A source of noise: white, pink, a band of breath or a digital grain, with its own filters and envelope like any other source.
All-pass filter
A filter that lets every frequency through at its level and changes only its phase; beside the dry sound it makes notches, the way a phaser works. Aetheriae's All-pass filter type is a phase shifter: every frequency turned by the same angle, which an LFO turning it round makes a frequency shift.
ADSR
The four stages of an envelope: Attack (how long it takes to rise), Decay (how long to fall to the sustain level), Sustain (the level held while the key is down) and Release (how long it takes to fade once the key is up).
Algorithm
In FM, how the operators are wired: which modulate which, and which are heard.
Aliasing
Harsh, inharmonic tones a digital oscillator makes when its harmonics go above what the sample rate can hold. Band-limited waveforms avoid it.
Arpeggiator
Plays the held keys one after another, in time, instead of all at once.
Band-limited
A waveform made with no harmonics above what the sample rate can hold, so it does not alias, however high the note.
Bell filter
See Peak.
Bipolar
An LFO that moves its destination both ways round where the knob is set. See also Unipolar.
Bucket-brigade chip
An analogue delay chip that passes the sound along a chain of tiny capacitors, as buckets of water passed hand to hand; the sound of the old ensembles, choruses and echoes: darker and warmer the longer the delay. Short: BBD.
Carrier
In FM, an operator that is heard. See also Modulator.
Chorus
Copies of the sound, slightly delayed and swept, mixed with it: a wider, moving sound.
Cutoff
The frequency where a filter starts to take the sound away.
DAW
The program you make music in: Ableton Live, Logic Pro, Cubase, Bitwig Studio, Reaper and the like.
Destination
What a modulation source moves: a knob, the cutoff, a source's pitch.
Drift
Each voice wandering slightly out of tune on its own, as the oscillators of an old analogue synthesizer.
Ensemble
The string machine's chorus: three delay lines swept by two LFOs, which makes one string sound like a section.
Envelope
A shape over time, started by every note: how a level, a filter or another destination moves from the key down to the key up and after. Each of its slopes has a curve: linear, logarithmic or exponential.
Exciter
What sets a resonator ringing: a strike, a pluck, a bow, a breath, noise or another source.
Flutter
A fast tremble of the pitch, as a tape transport's.
Formant
A peak in a sound's spectrum that the ear hears as a vowel. A formant filter (a vowel filter, as Vox is) puts such peaks into a sound.
Frame
One waveform of a wavetable.
Frequency modulation
A sine wave's pitch moved very fast by another, which makes new partials: bells, electric pianos, metallic tones. Short: FM.
Fundamental
The lowest component of a pitched sound, at the note's own frequency: what the ear hears as its pitch.
Glide
Sliding from one note's pitch to the next. Also portamento.
Grain
A short piece of a sample, played among many others to make a cloud of sound.
Granular synthesis
Playing a recording as many short, overlapping grains rather than from start to end, so it can be held still, stretched or scattered into a cloud.
Harmonic
A component of a sound at a whole-number multiple of the fundamental: twice, three times, four times its frequency. Their levels make the tone.
Index
In FM, how strongly the modulators move the carriers: the brightness.
Karplus-Strong
A plucked string made from a short delay loop excited by a burst of noise, ringing at the loop's pitch and darkening as it fades (Kevin Karplus and Alex Strong, 1983).
Key tracking
How far a setting (a filter's cutoff, an Air source's colour) follows the keys up and down.
Master filter
The two filters a voice passes as a whole, after its sources have been summed; the Filter section.
Matrix
A table of modulation routings: in each row a source, an amount and a destination.
Modal synthesis
A ringing object made from its modes: a bank of resonances, each at one of its partials, struck together.
Modulator
In FM, an operator that is not heard but moves the pitch of another, making overtones. See also Carrier.
Notch
A filter that takes a band around its cutoff away and leaves the rest: the opposite of a bandpass.
Operator
In FM, one sine oscillator with its own level and pitch ratio.
Partial
Any one of the sine waves a sound is made of, harmonic or not. A bell's partials are not whole multiples of its fundamental.
Parallel
Two filters side by side, the sound going through both and the two added. See also Series.
Patch
A sound: the settings of every control. In Aetheriae, a preset.
Peak
A filter that raises or lowers a band around its cutoff, as one band of an equaliser: a bell.
Phase distortion
A cosine read unevenly through its cycle, so its shape bends and harmonics come in, as on the Casio CZ synthesizers. Short: PD.
Physical modelling
Making a sound by modelling the instrument that makes it: what sets it vibrating (the exciter) and what rings (the resonator).
Polarity
Whether an LFO moves both ways (bipolar) or one way (unipolar).
Preset
A sound saved under a name, with its category, author and description.
Pulse width
How much of a pulse wave's cycle is up: half for a square, less for a thinner, more nasal pulse.
Ratio
In FM, an operator's frequency as a multiple of the note's: whole numbers sound harmonic, others metallic.
Resonance
A filter's emphasis round its cutoff, from a soft bump to a whistle.
Resonator
A physical model that rings like a real object, a string, bar, bell or plate, when an exciter sets it going.
Sample
A recording, played by a source at the pitch of the keys.
Series
Two filters one after the other, the sound going through the first and then the second. See also Parallel.
Shelving filter
A filter that raises or lowers everything below (low shelf) or above (high shelf) its cutoff, as a tone control's bass and treble.
Shimmer
A reverb whose tail is pitched up as it rings, an octave or a fifth, a halo of sound.
Slicer
Cuts the sound in time with the song by a pattern of steps.
Source
One of a voice's up to eight sound makers: a wave, a sample, FM, phase distortion, a resonator or air, each with its own two filters and amp envelope.
Spread
Detuning a voice's sources against each other, evenly from flat to sharp, for a wider, beating sound.
String machine
The string ensemble keyboards of the seventies, such as the Solina String Ensemble, the ARP Omni, Roland's RS-202 and the Elka Rhapsody: a few registers of simple waves through an ensemble that makes one tone a section. Aetheriae's roots.
Sub
A sine an octave below a wave source, for weight underneath.
Subtractive synthesis
Making a sound by starting from a wave rich in harmonics and taking some away with a filter.
Supersaw
Several sawtooth waves slightly out of tune with each other, as in Roland's JP-8000: a huge, shimmering sound.
Unipolar
An LFO that moves its destination one way only from where the knob is set. See also Bipolar.
Velocity
How hard a key is struck.
Voice
What plays one note: all its sources with their filters and envelopes, and its master filter. Aetheriae has sixteen.
Vox
A vowel filter type, also called a formant filter: three resonances standing where a sung vowel's formants are, moved from A to U by its Vowel knob and up or down by Shift.
Wavefolder
Folds a wave back on itself when it is driven past its top, adding harmonics: the bright sound of west-coast synthesizers.
Waveguide
A delay line in a loop, as long as one period of the note, standing for a string or a tube that a wave travels along.
Wavetable
A series of waveforms a source moves through with its Position.
Wow
A slow waver of the pitch, as a tape or record whose speed is not quite steady.
Abbreviations
Abbreviation
Stands for
ADSR
Attack, Decay, Sustain, Release
AP
All-pass (filter)
AU
Audio Unit (Apple's plugin format)
BBD
Bucket-brigade device (an analogue delay chip)
BP
Band-pass (filter)
BPM
Beats per minute
CLAP
CLever Audio Plug-in (a plugin format)
ct
Cent (a hundredth of a semitone)
DAW
Digital audio workstation
EQ
Equaliser
dB
Decibel
DCW
Digitally controlled wave (phase distortion's envelope, after the Casio CZ)
Pulse-width modulation (a pulse whose width moves)
RMS
Root mean square (a level's average loudness)
st
Semitone
VFD
Vacuum fluorescent display
VHS
Video Home System (a video tape format)
VST3
Virtual Studio Technology 3 (Steinberg's plugin format)
Controls
Every control, section by section, with its range, its default (the Init sound) and what it does: the same text its tooltip shows. A block that repeats (each of the eight sources and each of its filters, the master filter's two, each LFO, envelope and matrix row, the slicer's steps) is listed once.
Sources
Control
Range
Default
What it does
Sources
1, 2, 3, 4, 5, 6, 7, 8
1
On each source
Off, On
On
This source sounds while it is on; its number on the tab is in colour then
Wave each source
see Waves
Sine
What this source plays: click to choose, from those of its Type Shortcut: the up and down arrow keys step through them, in the menu's order Sine, triangle, saw and square are single waveforms The wavetables are rows of waveforms that Position moves through: the drawing follows it Or a sample of your own: a recording played at the pitch of the keys
Position each source
0 % to 100 %
0 %
Where in its wavetable this source reads: it morphs from the table's first waveform to its last Only for the wavetables; for a square it sets the pulse width
Level each source
0 % to 100 %
100 %
How loud this source is against the others
Pitch each source
-24 st to +24 st
0 st
This source's pitch against the others, in semitones: 12 is an octave up, 7 a fifth, -12 an octave down Double-click: back to zero
Pan each source
L 100 to R 100
center
Where this source sits between left and right Double-click: back to the middle
Sub each source
0 % to 100 %
0 %
Adds a sine an octave below this source, in the same place between left and right
Mode each source
One-shot, Loop, Grains
Loop
How this source plays its sample One-shot: from the start to the end, once, at the note's pitch Loop: from the start, round a loop as long as Length, its end blending into its start Grains: short overlapping pieces read around Position: the recording held still and breathing, for pads Grains cost more processing than a waveform
Length each source
0 % to 100 %
100 %
How much of the sample after the start is looped, up to all of it The loop's end blends into its start: a quarter of the loop, at most 0.1 s A sound that dies away is held at an even level, so it does not jump back up at every turn
Grain each source
10.0 ms to 500 ms
120 ms
How long each grain is, 10 to 500 ms Short grains buzz and flutter; long ones blur into a smooth wash
Density each source
1.00 Hz to 50.00 Hz
12.00 Hz
How many grains start every second, 1 to 50 Few is sparse and stuttering; many overlap into a continuous sound
Spray each source
0 % to 100 %
20 %
How far each grain strays from Position (up to a fifth of the sample either way), and from the middle between left and right 0 is one place, held still; more is a cloud
Type each source
Wave, Resonator, FM, Phase distortion, Air
Wave
What this source is Wave: a waveform (sine, saw, square, triangle, noise) or a wavetable, a row of waveforms that Position moves through, the factory's or a file of your own Sample: a recording, the factory's or your own, played at the key's pitch FM: six sine operators modulating each other, played with eight macros Phase distortion: a cosine whose phase is bent within each cycle, as on a Casio CZ: a sine at Amount 0, brighter as Amount goes up, like a filter opening Resonator: something that rings at the key's pitch (a bar, a bell, a membrane or a string) and what sets it ringing: an exciter of its own, or another source
What sets the resonator ringing Impulse: a single click Mallet: a soft or hard strike (Hardness) Pluck: a burst of noise one period long, as a plucked string These three strike once at the start of the note Noise: noise, held as long as the envelope says Blow: breath, its strength wandering Particle: tiny random ticks, sparse or dense Bow: a bow drawn across it, gripping and slipping, at the speed of the envelope (Strike is where it is bowed on a string) These four follow the exciter's envelope Shortcut: the up and down arrow keys step through them
Input each source
Internal, 1, 2, 3, 4, 5, 6, 7, 8
Internal
Internal: the exciter beside it Or a source's own signal, before its Level and Pan: set that source's Level to 0 to hear only the resonance A source that is off, or is a resonator itself, gives nothing
Gate each source
Off, On
On
On: the exciter's envelope shapes the input source's signal (a short decay strikes, a slow attack swells) Off: the source feeds the resonator for as long as the note lasts, as with sympathetic strings
Exciter attack each source
0.5 ms to 5.00 s
1.0 ms
The exciter's envelope: how long it takes to rise, from the start of the note For the noise, blow and particle exciters, and an input source with Gate on
Exciter decay each source
5.0 ms to 10.00 s
200 ms
How long the exciter takes to fall to its sustain level, and to fall away after the key is let go
Exciter sustain each source
0 % to 100 %
0 %
The exciter's level while the key is held: above zero it keeps bowing, blowing or rattling the resonator
Colour each source
0 % to 100 %
50 %
The exciter's own control Impulse and pluck: dark to bright Mallet: Hardness, soft felt to hard plastic Noise: dark to white Blow: Breath, a soft breath to a hissing one Particle: Density, a few ticks a second to hundreds Bow: Pressure, from a light touch (airy) to a heavy one (gritty)
Model each source
Modal, String
Modal
Modal: 32 partials, each a resonant filter: bars, membranes and bells (Structure) String: a vibrating string, a delay one period long with its losses: plucked, struck or bowed by the exciter
Structure each source
0 % to 100 %
25 %
Modal: where its partials lie, from harmonic (0) through a stiff string, a bar (marimba, 50 %) and a membrane (75 %) to a bell (100 %) String: Stiffness, its higher partials pulled sharp, as on a piano (most on high notes)
Brightness each source
0 % to 100 %
60 %
How long the higher partials ring against the lowest Low: they die fast, a soft wooden sound; high: they ring on with it, glassy and metallic
Damping each source
0 % to 100 %
40 %
How long it rings: about 20 seconds at 0 to 10 ms at 100 % With a short Release on the amp envelope the ring is cut off when the key is let go
Strike each source
0 % to 100 %
30 %
Where it is struck (or heard), from the edge to the middle At a partial's node that partial is not set ringing: struck in the middle a string loses its even harmonics
BBD each source
Off, On
Off
The string's delay line as a bucket-brigade chip, the kind in string ensembles and analogue echoes: its filters in the loop (the top fades a little more each time round; the lower the note, the darker), loud strikes saturating, and a little hiss The string model only: the modal bank has no delay line
Invert each source
Off, On
Off
Turns the string's loop upside down, as a pipe closed at one end: only the odd harmonics ring, hollow and reedy, like a clarinet It stays at the note The string model only, and not with the bow (its grip and slip would pull it out of tune)
FM algorithm each source
Pairs, Stack, Twin stacks, Stack and pair, One to many, Many to one, Branch, Bell, Half additive, Additive
Pairs
How the six operators are wired: stacks, pairs, one modulating many, many modulating one, a bell, or additive (all heard) The display draws it Shortcut: the up and down arrow keys step through them
FM ratio mode each source
Harmonic, Free, Fixed
Harmonic
Harmonic: the ratio knobs snap to 0.5, 1, 2 .. 16 times the note (clean, in tune) Free: anywhere between (metallic, beating) Fixed: the ratio knobs are frequencies, 1 Hz to 10 kHz, whatever the note (drums, clangs)
FM velocity each source
Off, Low, Medium, High
Low
How far velocity moves the index: played harder, brighter Off: velocity changes nothing
FM carrier envelope each source
Amp, Own
Amp
Amp: the carriers stay at full level and the amp envelope shapes them Own: they decay in the mod envelope's time, down to silence: a pluck, even under a held amp envelope
FM carrier ratio each source
0 % to 100 %
20 %
The pitch of the carriers (what is heard) against the note: x1 is the note, x2 an octave up, x0.5 an octave down
FM mod ratio each source
0 % to 100 %
20 %
The pitch of the modulators against the note: the main choice of timbre Whole numbers sound harmonic (x1 a saw-like edge, x2 hollow, x3 reedy); between them, metallic
FM index each source
0 % to 100 %
30 %
How strongly the modulators move the carriers, all together: from a pure sine to bright and buzzing
FM harmonics each source
0 % to 100 %
0 %
Pulls the modulators apart, away from the harmonics: from clean through bell-like to clangorous
FM feedback each source
0 % to 100 %
0 %
One operator modulating itself: from a sine through a saw-like buzz to noise
FM detune each source
0 % to 100 %
0 %
Pulls the operators apart in pairs, one sharp and one flat, up to 15 cents: a slow beating, wider
FM mix each source
0 % to 100 %
50 %
With more than one carrier: the first against the others In the middle all are as loud
FM mod envelope each source
0 % to 100 %
40 %
How the modulators' level moves after the note starts: low is a short pluck (bright for an instant), high a slow evolving decay that holds part way
Wavefold each source
0 % to 100 %
0 %
Drives the wave past its top so it folds back on itself: from the original wave as it is (0) to a bright, sizzling, west-coast sound Off at 0
Symmetry each source
-100 % to 100 %
0 %
Shifts the wave before it folds, so it folds unevenly: adds the even harmonics, hollow to nasal Only with Wavefold above 0 Double-click: back to the middle
How the phase is bent within each cycle Saw, Square, Pulse: the cosine squeezed towards the start of each half, or of the cycle Double sine: an octave comes in Saw pulse: a saw followed by a pause Reso 1, 2, 3: a resonance at Resonance times the note, started again every cycle under a saw, a triangle or a trapezoid Shortcut: the up and down arrow keys step through them
A second shape, played every other cycle (the CZ's wave 1 + wave 2): the two alternate, which brings in the octave below Off: every cycle the same
PD amount each source
0 % to 100 %
25 %
How far the phase is bent (the CZ's DCW): 0 % is a sine; turning it up opens the sound like a filter The envelope adds to it, note by note
PD resonance each source
×1.0 to ×16.0
×4.0
The Reso shapes' resonance, in times the note (Amount takes it from the note up to this) Only the Reso shapes use it
PD skew each source
-100 % to 100 %
0 %
Moves the middle of the cycle off center, the shape leaning one way or the other: more colours from one shape As far as Amount goes: at 0 % it is still a sine
PD envelope each source
-100 % to 100 %
50 %
How far each note's envelope moves Amount, up or (below zero) down: the CZ's DCW envelope, a pluck or a sweep The dashed line on the drawing is where it takes the wave
PD attack each source
0.5 ms to 5.00 s
1.0 ms
How fast the envelope rises when a note starts
PD decay each source
5.0 ms to 10.00 s
600 ms
How long the envelope takes to fall to its sustain; at the end of the note it falls in the amp's release time
PD sustain each source
0 % to 100 %
30 %
Where the envelope holds while the key is down
PD res envelope each source
-100 % to 100 %
0 %
How far the envelope moves the resonance, up to four octaves either way (Reso shapes)
PD velocity each source
Off, Low, Medium, High
Low
How far velocity scales Amount: played harder, brighter Off: velocity changes nothing
Air type each source
White, Pink, Breath, Grain
White
What the air is made of White: plain hiss Pink: softer on top, more body Breath: a band of noise around the colour, like blown air Grain: noise held in steps, a digital rasp
Air colour each source
0 % to 100 %
60 %
Where the noise sits, from low and wide to only the very top
Air track each source
0 % to 100 %
0 %
How far the colour follows the keys 0 %: the same for every note 100 %: an octave up the keyboard is an octave up in colour, so the air has a pitch of its own (try it with Breath)
Amp attack each source
1.0 ms to 20.00 s
80.0 ms
How long this source's notes take to swell in Every source has an envelope of its own
Amp attack curve each source
Lin, Log, Exp
Log
Amp decay each source
5.0 ms to 10.00 s
500 ms
How long the note takes to fall from its peak to the sustain level With Sustain at 100 % there is nothing to fall to
Amp decay curve each source
Lin, Log, Exp
Exp
Amp sustain each source
0 % to 100 %
100 %
The level a held note settles at
Amp release each source
5.0 ms to 30.00 s
600 ms
How long a note takes to fade once the key is up A note is over once the longest of its sources' releases has died away
Amp release curve each source
Lin, Log, Exp
Exp
Routing each source
Series, Parallel
Series
How this source's two filters are joined Series: the sound goes through Filter A, then through Filter B Parallel: it goes through both side by side and the two are added (a lowpass and a highpass side by side leave the low and the high; a filter beside an all-pass makes notches) A filter that is off is left out either way
Sine, Triangle, Saw up, Saw down, Square, Random, Smooth random
Sine
Filter B LFO 1 rate each source
0.02 Hz to 10.00 Hz
0.20 Hz
Filter B LFO 1 depth each source
0 % to 100 %
0 %
Filter B LFO 1 reset each source
Off, On
Off
Filter B LFO 1 single shot each source
Off, On
Off
Filter B LFO 1 polarity each source
Bipolar, Unipolar
Bipolar
Filter B LFO 1 to each source
Cutoff, Resonance, Key track, Envelope
Cutoff
Filter B LFO 2 shape each source
Sine, Triangle, Saw up, Saw down, Square, Random, Smooth random
Sine
Filter B LFO 2 rate each source
0.02 Hz to 10.00 Hz
0.20 Hz
Filter B LFO 2 depth each source
0 % to 100 %
0 %
Filter B LFO 2 reset each source
Off, On
Off
Filter B LFO 2 single shot each source
Off, On
Off
Filter B LFO 2 polarity each source
Bipolar, Unipolar
Bipolar
Filter B LFO 2 to each source
Cutoff, Resonance, Key track, Envelope
Resonance
All sources
Control
Range
Default
What it does
Tune
-12.00 st to +12.00 st
0.00 st
Master tuning, up to an octave either way Double-click: back to zero
Spread
0.0 ct to 50.0 ct
0.0 ct
Detunes the sources that are on against each other, evenly from flat to sharp At 0 they sound as one Samples are detuned as well: each plays a little faster or slower, so two sources on the same sample drift apart into a chorus, a one-shot on one of them ends a little sooner, and grains read at slightly different pitches widen the cloud Out of use with one source: there is nothing to detune it against
Routing
Series, Parallel
Series
How the master filter's two are joined Series: the voices go through Filter A, then through Filter B Parallel: through both side by side, the two added A filter that is off is left out either way
Filter A on
Off, On
On
On or off: off, the sound passes it untouched, its envelope and LFOs too, and it costs nothing
LP 24 and LP 12: lowpass, steep or gentle, what is below the cutoff passes BP: a band around the cutoff HP: highpass, what is above passes Notch: takes a band around the cutoff away Peak: a bell that raises or lowers the band around the cutoff (the Resonance knob is its gain) Low shelf, High shelf: raise or lower everything below, or above, the cutoff (the knob is the gain) All-pass: a phase shifter, every frequency turned by the same angle (its one knob, Phase): the level stays, the wave changes; turned by an LFO it shifts the frequencies Vox: a vowel (formant) filter, A to U across the cutoff's range (the knob is the formant shift)
Filter A cutoff
20.00 Hz to 20.0 kHz
20.0 kHz
The cut-off frequency, 20 Hz to 20 kHz: where the filter starts to take the sound away (or, for a peak or shelf, where its band sits) A lowpass at the very top is out of the way altogether
Filter A resonance
0 % to 100 %
0 %
Emphasises the sound at the cutoff, up to a sharp, whistling peak
Filter A key track
0 % to 100 %
0 %
How far the cutoff follows the keys: at 100 % every note is filtered alike
Filter A envelope
-100 % to 100 %
0 %
How far the filter's envelope moves the cutoff, up or down, by up to eight octaves Its shape is on the Envelope tab Double-click: back to zero
Filter A attack
1.0 ms to 5.00 s
300 ms
How long the cutoff takes to reach the top of its move
Filter A attack curve
Lin, Log, Exp
Log
Filter A decay
5.0 ms to 10.00 s
1.00 s
How long it takes to settle at the sustain level
Filter A decay curve
Lin, Log, Exp
Exp
Filter A sustain
0 % to 100 %
50 %
Where the cutoff rests while the key is held, as a share of the move
Filter A release
5.0 ms to 10.00 s
1.00 s
How long the cutoff takes to fall back once the key is up
Filter A release curve
Lin, Log, Exp
Exp
Filter A LFO 1 shape
Sine, Triangle, Saw up, Saw down, Square, Random, Smooth random
Sine
Filter A LFO 1 rate
0.02 Hz to 10.00 Hz
0.20 Hz
Filter A LFO 1 depth
0 % to 100 %
0 %
Filter A LFO 1 reset
Off, On
Off
Filter A LFO 1 single shot
Off, On
Off
Filter A LFO 1 polarity
Bipolar, Unipolar
Bipolar
Filter A LFO 1 to
Cutoff, Resonance, Key track, Envelope
Cutoff
Filter A LFO 2 shape
Sine, Triangle, Saw up, Saw down, Square, Random, Smooth random
Sine
Filter A LFO 2 rate
0.02 Hz to 10.00 Hz
0.20 Hz
Filter A LFO 2 depth
0 % to 100 %
0 %
Filter A LFO 2 reset
Off, On
Off
Filter A LFO 2 single shot
Off, On
Off
Filter A LFO 2 polarity
Bipolar, Unipolar
Bipolar
Filter A LFO 2 to
Cutoff, Resonance, Key track, Envelope
Resonance
Filter B on
Off, On
Off
On or off: off, the sound passes it untouched, its envelope and LFOs too, and it costs nothing
LP 24 and LP 12: lowpass, steep or gentle, what is below the cutoff passes BP: a band around the cutoff HP: highpass, what is above passes Notch: takes a band around the cutoff away Peak: a bell that raises or lowers the band around the cutoff (the Resonance knob is its gain) Low shelf, High shelf: raise or lower everything below, or above, the cutoff (the knob is the gain) All-pass: a phase shifter, every frequency turned by the same angle (its one knob, Phase): the level stays, the wave changes; turned by an LFO it shifts the frequencies Vox: a vowel (formant) filter, A to U across the cutoff's range (the knob is the formant shift)
Filter B cutoff
20.00 Hz to 20.0 kHz
20.0 kHz
The cut-off frequency, 20 Hz to 20 kHz: where the filter starts to take the sound away (or, for a peak or shelf, where its band sits) A lowpass at the very top is out of the way altogether
Filter B resonance
0 % to 100 %
0 %
Emphasises the sound at the cutoff, up to a sharp, whistling peak
Filter B key track
0 % to 100 %
0 %
How far the cutoff follows the keys: at 100 % every note is filtered alike
Filter B envelope
-100 % to 100 %
0 %
How far the filter's envelope moves the cutoff, up or down, by up to eight octaves Its shape is on the Envelope tab Double-click: back to zero
Filter B attack
1.0 ms to 5.00 s
300 ms
How long the cutoff takes to reach the top of its move
Filter B attack curve
Lin, Log, Exp
Log
Filter B decay
5.0 ms to 10.00 s
1.00 s
How long it takes to settle at the sustain level
Filter B decay curve
Lin, Log, Exp
Exp
Filter B sustain
0 % to 100 %
50 %
Where the cutoff rests while the key is held, as a share of the move
Filter B release
5.0 ms to 10.00 s
1.00 s
How long the cutoff takes to fall back once the key is up
Filter B release curve
Lin, Log, Exp
Exp
Filter B LFO 1 shape
Sine, Triangle, Saw up, Saw down, Square, Random, Smooth random
Sine
Filter B LFO 1 rate
0.02 Hz to 10.00 Hz
0.20 Hz
Filter B LFO 1 depth
0 % to 100 %
0 %
Filter B LFO 1 reset
Off, On
Off
Filter B LFO 1 single shot
Off, On
Off
Filter B LFO 1 polarity
Bipolar, Unipolar
Bipolar
Filter B LFO 1 to
Cutoff, Resonance, Key track, Envelope
Cutoff
Filter B LFO 2 shape
Sine, Triangle, Saw up, Saw down, Square, Random, Smooth random
Sine
Filter B LFO 2 rate
0.02 Hz to 10.00 Hz
0.20 Hz
Filter B LFO 2 depth
0 % to 100 %
0 %
Filter B LFO 2 reset
Off, On
Off
Filter B LFO 2 single shot
Off, On
Off
Filter B LFO 2 polarity
Bipolar, Unipolar
Bipolar
Filter B LFO 2 to
Cutoff, Resonance, Key track, Envelope
Resonance
Ensemble / Chorus
Control
Range
Default
What it does
On
Off, On
Off
On or off
BBD
Off, On
Off
The delay lines as bucket-brigade chips: 512 stages for the ensemble, as in the string machines, 256 for the chorus, as in the classic synth choruses Darker, a little saturated, a faint hiss
Type
Ensemble, Chorus
Ensemble
Ensemble: three modulated delay lines, the string-machine sound Chorus: two lines and one LFO, a calmer movement
Rate
0 % to 100 %
50 %
The speed of the movement Ensemble: 50 % is the classic pair of LFOs
Depth
0 % to 100 %
60 %
How far the copies drift from the dry sound: how much their short delay times are moved back and forth More makes the shimmer and the slight detuning wider and deeper; too much sounds seasick Ensemble: up to 1.6 ms of slow movement with a little fast; Chorus: up to 3 ms either way
Mix
0 % to 100 %
70 %
0 % is the dry sound, 100 % only the effect
Phaser
Control
Range
Default
What it does
On
Off, On
Off
On or off
Stages
4, 8
4
4: a gentle sweep 8: more notches, a deeper swirl
Rate
0.02 Hz to 8.00 Hz
0.30 Hz
Depth
0 % to 100 %
50 %
The notches arrive in the first quarter turn, the rest widens the sweep
Feedback
-90 % to 90 %
0 %
Sharpens the notches: positive and negative sound different Double-click: back to zero
Width
0° to 180°
90°
How far the right channel's sweep runs behind the left's
Lo-fi
Control
Range
Default
What it does
Drift on
Off, On
Off
Every voice wanders a little out of tune in its own slow way, like an old analogue synth
Drift depth
0.0 ct to 50.0 ct
10.0 ct
How far a voice wanders: 5 to 15 cents is the classic amount
Drift rate
0.05 Hz to 2.00 Hz
0.25 Hz
How often a voice's tuning moves on
Drift shape
Smooth, Steps
Smooth
Smooth: the tuning glides from one place to the next Steps: it jumps and holds
Wow on
Off, On
Off
The slow waver of a warped tape, on the whole sound
Wow depth
0.0 ct to 50.0 ct
6.0 ct
The slow waver of a warped tape: the pitch of the whole sound swings by this much, a few cents for a worn cassette
Wow rate
0.10 Hz to 2.00 Hz
0.50 Hz
A tape wavers at around half a cycle a second
Wow shape
Sine, Random
Sine
Sine: a steady swing Random: an uneven one, as a tape that sticks
Wow place
Pre, Post, Out
Post
Where this effect sits in the chain Pre: before the ensemble and phaser, which then play back the worn sound and soften it Post: after them, so the sound with its ensemble and phaser goes onto the tape Out: at the very end, after the delay and reverb: everything, echoes and tail included, as if the finished track had been recorded
Flutter on
Off, On
Off
The quick tremble of a tape transport, on the whole sound
Flutter depth
0.0 ct to 20.0 ct
2.0 ct
The quick tremble of a tape transport, on top of the wow It wants only a cent or two
Flutter rate
4.00 Hz to 14.00 Hz
8.00 Hz
Flutter place
Pre, Post, Out
Post
Where this effect sits in the chain Pre: before the ensemble and phaser, which then play back the worn sound and soften it Post: after them, so the sound with its ensemble and phaser goes onto the tape Out: at the very end, after the delay and reverb: everything, echoes and tail included, as if the finished track had been recorded
Crush on
Off, On
Off
Fewer bits and a lower sample rate: the grain of an early sampler
Crush mix
0 % to 100 %
60 %
Blends in the sound at fewer bits and a lower sample rate, the grain of an early sampler
Crush bits
4.0 bit to 16.0 bit
12.0 bit
12 is an early sampler; below 8 it gets rough
Crush rate
2.00 kHz to 48.0 kHz
28.0 kHz
26 to 32 kHz is an early sampler: the top turns grainy Lower, and it rings and folds
Crush place
Pre, Post, Out
Post
Where this effect sits in the chain Pre: before the ensemble and phaser, which then play back the worn sound and soften it Post: after them, so the sound with its ensemble and phaser goes onto the tape Out: at the very end, after the delay and reverb: everything, echoes and tail included, as if the finished track had been recorded
Tape on
Off, On
Off
Cassette or VHS: saturation, hiss and dropouts
Tape drive
0 % to 100 %
40 %
Cassette saturation: quiet sounds come up, loud ones are held, and the top gets duller the harder it is driven
Tape hiss
0 % to 100 %
20 %
How loud the hiss is: half way is about -40 dB
Tape hiss mode
Follow, Always
Follow
Follow: hiss while the instrument sounds, fading a second or two after it (and its echoes, at Out) stop, so the track is silent between phrases Always: the hiss of a running tape, in the silences too Always never lets the track go silent, and every bounce carries it from start to end
Tape place
Pre, Post, Out
Post
Where this effect sits in the chain Pre: before the ensemble and phaser, which then play back the worn sound and soften it Post: after them, so the sound with its ensemble and phaser goes onto the tape Out: at the very end, after the delay and reverb: everything, echoes and tail included, as if the finished track had been recorded
Tape machine
Cassette, VHS
Cassette
Cassette: a bright top, a thin hiss VHS: the sound of a video's linear audio track: the top gone above about 9 kHz, the bass bump of its heads, a darker hiss, and its dropouts come as tracking errors with a burst of noise
Tape dropouts
0 % to 100 %
0 %
Now and then the tape loses the head for a moment: the level and the top dip, for 30 to 250 ms Up, they come more often (up to twice a second) and deeper; on VHS each is a tracking error, with a burst of noise
Vinyl on
Off, On
Off
The sound on a record: its crackle, its surface noise, and its wear
Vinyl crackle
0 % to 100 %
50 %
Pops and clicks, from a few a second to a dense crackle: mostly small, now and then a big pop, each a little more on one side
Vinyl noise
0 % to 100 %
30 %
The groove's surface noise and the turntable's rumble
Vinyl wear
0 % to 100 %
40 %
How old the record is: the top and the bottom narrow in (to about 4.5 kHz and 180 Hz at the end) and the crackle gets denser
Vinyl place
Pre, Post, Out
Out
Where this effect sits in the chain Pre: before the ensemble and phaser, which then play back the worn sound and soften it Post: after them, so the sound with its ensemble and phaser goes onto the tape Out: at the very end, after the delay and reverb: everything, echoes and tail included, as if the finished track had been recorded
Vinyl mode
Follow, Always
Follow
Follow: the crackle and the noise play with the sound, fading a second or two after it stops Always: a record that keeps turning, its crackle and noise in the silences too
Delay
Control
Range
Default
What it does
On
Off, On
Off
On or off Switched off, its echoes stop at once
BBD
Off, On
Off
A bucket-brigade echo: the longer the time, the darker the repeats, as the chip's clock slows down The chip is the one an echo of that time would be built with: 256 stages below 2.6 ms, 512 below 5.1 ms, 1024 below 10.2 ms, 2048 below 20.5 ms, 4096 for anything longer Each repeat gets darker and a little saturated, with a faint hiss
Mix
0 % to 100 %
30 %
Up to 50 % the repeats are added, beyond that the dry sound makes room for them
Sync
Off, On
On
On: the delay time is a note value at the song's tempo Off: it is set freely, in milliseconds
Time
1.0 ms to 2.00 s
375 ms
The delay time It glides when changed, like a tape delay
The delay time as a note value T is a triplet, D is dotted Without a host tempo the Tempo knob by the keyboard is the tempo
Feedback
0 % to 95 %
40 %
How much of each repeat goes round again
Mode
Stereo, Ping-pong
Ping-pong
Stereo: each side repeats on its own Ping-pong: the repeats jump from left to right
Low cut
20.00 Hz to 1.00 kHz
120 Hz
Takes the bottom out of the repeats, more with every pass
High cut
500 Hz to 20.0 kHz
6.00 kHz
Darkens the repeats, more with every pass
Reverb
Control
Range
Default
What it does
On
Off, On
Off
On or off Switched off, its tail stops at once
Mix
0 % to 100 %
30 %
Up to 50 % the reverb is added, beyond that the dry sound makes room for it
Pre-delay
0.0 ms to 250 ms
20.0 ms
The gap before the reverb starts: keeps the sound in front of the room
Size
0 % to 100 %
60 %
The size of the space: small rooms to very large halls; for the spring, longer springs
Decay
200 ms to 20.00 s
3.50 s
How long the reverb takes to die away (by 60 dB)
Damping
0 % to 100 %
40 %
How much faster the high frequencies die away than the rest: a darker, softer tail
Low cut
20.00 Hz to 1.00 kHz
120 Hz
Keeps the low end out of the reverb, so it does not get muddy
Mod
0 % to 100 %
30 %
Slowly moves the reverb's echoes against each other: a lusher, chorused tail; for the spring, the tank's sway
Width
0 % to 100 %
100 %
The reverb's stereo width, from mono to full
Type
Hall, Shimmer, Spring
Hall
Hall: a smooth, dense room, from small to very large (Size) Shimmer: the hall with its tail pitched up and sent round again, so every echo climbs: the ambient pad's halo Spring: a spring tank, as in guitar amps and dub: every echo comes back as a chirp, the highs first, the drip and boing of the springs Changed while it rings, the old tail fades out quickly
Freeze
Off, On
Off
Holds what the reverb is ringing for as long as it is on: nothing fades, nothing new goes in. Play over the frozen chord: what you play is heard dry, whatever the Mix Let go, the tail dies away as set Works with every type
Shimmer
0 % to 100 %
50 %
How much of the pitched tail is sent round again: a faint halo up to a rising cascade (with a long Decay it keeps climbing)
Interval
Octave, Fifth, Two octaves, Octave down
Octave
How far the shimmer pitches the tail each time round: an octave, a fifth or two octaves up, or an octave down
Chord
Control
Range
Default
What it does
Chord mode
Off, On
Off
Off: play as usual, 16 voices On: every key plays a whole chord
Type
Maj, Min
Min
Major or minor chords
Bass
Off, On
Off
Adds the root an octave down
Chord
2nd inv, 1st inv, Triad, Sus2, Sus4, Alt 5th, 7th
Triad
Inversions on the left, the plain triad in the middle, variants on the right Alt 5th: augmented in major, diminished in minor 7th: major 7th in major, minor 7th in minor
Arpeggiator
Control
Range
Default
What it does
On
Off, On
Off
Plays the keys you hold one after another, in time Its notes go out as MIDI too, for the DAW to record
Mode
Up, Down, Up Down, Down Up, Random, As played, Chord
Up
Up, Down, Up Down and Down Up run through the held keys by pitch Random picks any of them As played keeps the order you pressed them in Chord plays them all at once on every step
How many steps the pattern runs through before it starts again Fewer than 16, or one that does not divide the bar, runs across the bar line: 3 or 5 steps against a bar of four make syncopated, shifting rhythms
Depth
0 % to 100 %
100 %
How far a closed step is turned down: 100 % is silence
Gate
10 % to 100 %
60 %
How much of each step stays open 100 %: neighbouring steps join up
Place
Pre, Post
Pre
Pre: the slicer comes before the delay and the reverb, so every chop gets its echoes and its tail Post: it comes last and cuts the echoes and the tail as well, for a hard stutter
Step steps 1 to 16
0 % to 100 %
100 %
Modulation
Control
Range
Default
What it does
Glide
off to 5.00 s
off
How long a note takes to slide in from the one played before A chord slides as one All the way left is off
Rate
0.10 Hz to 12.00 Hz
5.00 Hz
How fast the pitch wobbles: how many times a second it goes up and down, 0.1 to 12 Around 5 to 6 is a singer's or a violinist's vibrato; slower is a lazy waver, faster a nervous trill It does nothing while Depth is at zero
Depth
0.0 ct to 100.0 ct
0.0 ct
How far the pitch wobbles either way, in cents (a hundredth of a semitone), up to 100 A few cents give a voice life; 20 to 40 is a clear vibrato; 100 swings a whole semitone up and down 0 is off
Sweep
-48.00 st to +48.00 st
0.00 st
A pitch envelope: every note starts this many semitones above (or below) its pitch and falls to it What makes a kick or a tom: a sine starting two or three octaves up and dropping in a few hundredths of a second 0 is off
Time
5.0 ms to 2.00 s
80.0 ms
How long the pitch takes to settle on the note after Sweep, from 5 ms (a click) to 2 s (a slow dive)
Shape each LFO
Sine, Triangle, Saw up, Saw down, Square, Random, Smooth random
Sine
How the LFO moves Sine and triangle: smoothly back and forth Saw up and saw down: a ramp that starts over each cycle Square: between two places Random: a new place each cycle, held (sample and hold) Smooth random: drifting from one random place to the next
Rate each LFO
0.02 Hz to 20.00 Hz
1.00 Hz
How fast the LFO cycles, 0.02 to 20 times a second
Depth each LFO
0 % to 100 %
50 %
How far the LFO moves its destination: at 100% all of the destination's range either way of where it is set (Bipolar), or all of it one way (Unipolar) At 0 it moves nothing
Reset each LFO
Off, On
Off
On: every note played starts the LFO's cycle over (the arpeggiator's notes too) Off: it runs on freely There is one of it for all the voices: a new note restarts it for the ones still sounding too
Single shot each LFO
Off, On
Off
On: the LFO runs one cycle from each note and then holds where it ended (each note starts it, whatever Reset says) Off: it cycles on
Polarity each LFO
Bipolar, Unipolar
Bipolar
Bipolar: the LFO moves its destination both ways round where it is set Unipolar: only up from there
Attack each envelope
1.0 ms to 20.00 s
500 ms
How long the envelope takes to rise from nothing to full, from each note, up to 20 seconds
Decay each envelope
5.0 ms to 20.00 s
1.00 s
How long it then takes to fall to the sustain level, up to 20 seconds
Sustain each envelope
0 % to 100 %
50 %
Where it stays while the key is held
Release each envelope
5.0 ms to 30.00 s
1.00 s
How long it takes to fall back to nothing once the key is let go, up to 30 seconds
Amount each envelope
-100 % to 100 %
50 %
How far the envelope moves its destination at its top: at 100% all of the destination's range up from where it is set, at -100% all of it down At 0 it moves nothing
What moves the destination Velocity: how hard the key was struck Aftertouch: how hard a held key is pressed (from a keyboard that sends it) Key: the note played, down from middle C and up from it (four octaves either way is all of it) Mod wheel: the wheel at the keyboard's left LFO 1 to 4, Env 1 and 2: the Modulation section's own, at full depth
Amount each matrix row
-100 % to 100 %
0 %
How far the source moves the destination at its fullest: at 100% all of the destination's range, at -100% all of it the other way Double-click: back to zero
Macro macros 1 to 8
0 % to 100 %
0 %
One knob that moves several controls at once, each as far as its link's amount says, from where that control is set To link a control: right-click it (a knob, a slider, a switch or a menu), Assign modulation from macro, and pick this macro Double-click its name to rename it A DAW can automate it like any other parameter
Tempo / Wheel
Control
Range
Default
What it does
Tempo
60.0 BPM to 200.0 BPM
138.0 BPM
The tempo of the slicer, the arpeggiator and the synced delay, here in the standalone app and the browser In a DAW they follow the song's tempo and position, and this knob is not shown
Hold
Off, On
Off
Keeps the notes after you let go of the keys, until you play a new one with none held down With the arpeggiator off, the notes themselves sound on (a latch); with it on, it keeps playing them With chord mode on, a key's whole chord is held Shortcut: Shift+H
Mod wheel
Vibrato, Cutoff, Position, Vowel, FM carrier ratio, FM mod ratio, FM index, FM harmonics, FM feedback, FM detune, FM mix, FM mod env, PD amount, PD resonance
Vibrato
What the modulation wheel moves: vibrato depth, the filter's cutoff (up), every source's position (in its wavetable or its sample), the Vox vowel, an FM macro, or the phase distortion sources' Amount or Resonance (up four octaves)
Output
Control
Range
Default
What it does
Volume
off to +24.0 dB
-6.0 dB
Shortcuts
Playing
A W S E D F T G Y H U J K O L P ;
Play notes (Settings, Playing: Computer keyboard plays notes)
Z / X
The keyboard an octave down / up
Shift+H
Hold on or off
Presets
← / →
The previous / next preset
Cmd (Ctrl on Windows)+Z
Undo
Cmd (Ctrl on Windows)+Shift+Z (or Ctrl+Y on Windows)
Redo
Shift+I
Init: every control back at its default
Shift+S
Save
Shift+A
Save as
Shift+E
Save the preset (or its pack) to a file
Shift+O
Load a preset or a pack from a file
Right-click the preset's name
Delete your preset
Type in the preset menu
Search by name or author; Enter loads the first found
Sources
↑ / ↓
The open source's wave, sample, exciter, algorithm or shape: the one before / after
Drag a source's tab
Moves the source among the others
Shift-click a tab
Picks the sources from the open one to it
Cmd (Ctrl on Windows)-click a tab
Picks one more, or leaves it out
Controls
Drag a knob up or down
Turns it; with Shift, finely
Mouse wheel over a knob
Turns it; with Shift, finely
Double-click
A knob, bar or wheel back to its default
The page
Shift+T
Tooltips on or off
Shift+V / Shift+Alt+V
The next / previous theme
Shift+M
The manual
Esc
Closes a menu or a dialog
The computer keyboard is named here as on a QWERTY keyboard; it plays by where the keys are, so on any layout the same places play the same notes.
Waves
The waveforms and wavetables a Wave source plays, in the order they are saved.
Wave
How it sounds
Saw
Bright and full, every harmonic: the string machine's wave
Square
Hollow and woody, the odd harmonics Position becomes its pulse width: narrower is thinner and more nasal
Triangle
Soft and round, a little brighter than a sine
Filter Sweep
A saw behind a lowpass that opens: from muffled to bright
PWM
A pulse narrowing from a square to a sliver: from hollow to thin and buzzy
Formant
One resonance climbing through the harmonics: a talking, nasal sweep
Choir
Sung vowels, oo - oh - ah - eh - ee
Glass
Odd harmonics that brighten, with a ring on top: glassy and clear
Organ
Drawbars pulled out one after another: from a flute stop to a full organ
Sync
A saw restarted by a slower one: the tearing, vocal sweep of oscillator sync
Comb
A saw with notches that slide apart: hollow, phasey, flanged
Sine
Pure and soft, no overtones at all
Saw Square
A saw turning into a square: from full to hollow
Octaves
The note and every octave above it, added in turn: open and pure
Fifths
Octaves and fifths stacked up: wide and organ-like
Overtone
One harmonic singing above the note and climbing: throat singing
Odd Even
From the odd harmonics only (hollow) to the even ones only (thin, an octave up)
Bell
A few wide-spaced partials: a soft bell, brighter along the table
Metal
The prime harmonics: cold, metallic, slightly out of this world
Reso Sweep
A saw behind a resonant filter that opens: a whistling sweep
Strings
A saw through the resonances of a wooden body: mellow to bright
Shimmer
Every harmonic rising and falling in its own time: a slow glitter
Wood
A struck wooden bar: warm, with a knock, harder along the table
Stone
A struck slab: dry, wide-spaced partials, rougher along the table
Harmonic Ladder
The harmonics come in one by one along the table: from a sine to a full, open tone
Fold
A sine through a wavefolder, folding over more along the table: hollow, then glassy and buzzy
Phase Dist
Phase distortion: a sine whose cycle is squeezed into a bright, saw-like edge
Noise
White noise: hiss with no pitch, for wind and breath through the filter
Pink Noise
Softer, darker noise: surf, rain, air
Reso PD
A resonance rising through the harmonics under a falling window: the classic phase-distortion filter sweep
Bitstep
A sine on fewer and fewer steps: from smooth to a coarse digital staircase
Drive
A sine driven harder and harder: round, then thick, then nearly square
Tilt
Every harmonic, tilting from warm and dark to bright and open: soft struck tones at the start
Square Sync
A square restarted by a slower cycle: a hollow, tearing sync sweep
Notch Sweep
A saw with one deep notch moving up through it: a slow, phasing hollowness
Ring
A sine ring-modulated by another one to eight times its pitch: metallic, bell-like sidebands
Rectify
A sine turning into its rectified hump: brighter, with a buzzing edge
Square Build
The odd harmonics added one by one: a sine building into a square, hollow and woody
Saw Stack
A saw with its octave and its twelfth coming in on top: bigger and brighter
User
Sample
FM algorithms
How an FM source's six operators are wired: what modulates what, and which are heard.
Algorithm
How it is wired
Pairs
Three carriers, each with a modulator of its own: three simple FM voices side by side, the classic electric piano
Stack
Six operators in a chain, each modulating the next: from a soft tone to the harshest, most complex FM
Twin stacks
Two chains of three: two rich FM voices, balanced with Mix
Stack and pair
A chain of four beside a simple pair: a complex tone with a clean one, for basses and leads
One to many
One modulator chain driving three carriers at the first three harmonics: an organ-like tone that brightens as one
Many to one
Four modulators at different multiples into one carrier, one of them modulated in turn: dense, buzzy and brassy
Branch
Two modulators into one carrier (one of them stacked), beside a pair: brass and reeds
Bell
Three pairs, their carriers at a bar's partials and their modulators well above: bells and chimes
Half additive
One FM pair under four sine carriers at harmonics: drawbars with a little bite
Additive
Six sine carriers at the first six harmonics, nothing modulated: a drawbar organ; Feedback adds an edge
Acknowledgements
With thanks to:
Jeremia Aelbrecht
for the great samples, the feedback, the synth discussions, and the "chicken-head discussions" that led to the theming system.
Kristel Giselle Dewulf
for the organic artwork, and for being my companion in life.
Émilie Gillet
for her wonderful contribution to the world of synthesizers with Mutable Instruments.
Oliver Lieb
for the great music along the way.
Matthew Philpott
for being part of the Morphor story.
Boris Uytterhaegen
for being part of the Morphor story.
Tim Verborgh
who made me listen to a synthesizer for the first time.